By: Team W10-03 Since: Aug 2018 Licence: MIT
- 1. Setting up
- 2. Design
- 3. Implementation
- 4. Documentation
- 5. Testing
- 6. Dev Ops
- Appendix A: Product Scope
- Appendix B: User Stories
- Appendix C: Use Cases
- Appendix D: Non Functional Requirements
- Appendix E: Glossary
- Appendix F: Product Survey
- Appendix G: Instructions for Manual Testing
- G.1. Launch and Shutdown
- G.2. Add a user
- G.3. Login a user
- G.4. Logout a user
- G.5. Find users
- G.6. Edit a user
- G.7. Delete a user
- G.8. Populate a user schedule via Timetable
- G.9. Edit a user schedule
- G.10. Find free time between two users
- G.11. Add a friend
- G.12. Delete a friend
- G.13. Add an event
- G.14. Add a poll
- G.15. Add a time poll
- G.16. Add poll options
- G.17. Delete an event
- G.18. Select an event
- G.19. Display poll
- G.20. Edit an event
- G.21. Find an event by attributes
- G.22. Find event by time
- G.23. List all events
- G.24. Set date
- G.25. Set time
- G.26. Join event
- G.27. Vote in poll
- G.28. Saving data
1. Setting up
1.1. Prerequisites
-
JDK
9or laterJDK 10on Windows will fail to run tests in headless mode due to a JavaFX bug. Windows developers are highly recommended to use JDK9. -
IntelliJ IDE
IntelliJ by default has Gradle and JavaFx plugins installed.
Do not disable them. If you have disabled them, go toFile>Settings>Pluginsto re-enable them.
1.2. Setting up the project in your computer
-
Fork this repo, and clone the fork to your computer
-
Open IntelliJ (if you are not in the welcome screen, click
File>Close Projectto close the existing project dialog first) -
Set up the correct JDK version for Gradle
-
Click
Configure>Project Defaults>Project Structure -
Click
New…and find the directory of the JDK
-
-
Click
Import Project -
Locate the
build.gradlefile and select it. ClickOK -
Click
Open as Project -
Click
OKto accept the default settings -
Open a console and run the command
gradlew processResources(Mac/Linux:./gradlew processResources). It should finish with theBUILD SUCCESSFULmessage.
This will generate all resources required by the application and tests. -
Open
XmlAdaptedPerson.javaandMainWindow.javaand check for any code errors-
Due to an ongoing issue with some of the newer versions of IntelliJ, code errors may be detected even if the project can be built and run successfully
-
To resolve this, place your cursor over any of the code section highlighted in red. Press ALT+ENTER, and select
Add '--add-modules=…' to module compiler optionsfor each error
-
-
Repeat this for the test folder as well (e.g. check
XmlUtilTest.javaandHelpWindowTest.javafor code errors, and if so, resolve it the same way)
1.3. Verifying the setup
-
Run the
seedu.address.MainAppand try a few commands -
Run the tests to ensure they all pass.
1.4. Configurations to do before writing code
1.4.1. Configuring the coding style
This project follows oss-generic coding standards. IntelliJ’s default style is mostly compliant with ours but it uses a different import order from ours. To rectify,
-
Go to
File>Settings…(Windows/Linux), orIntelliJ IDEA>Preferences…(macOS) -
Select
Editor>Code Style>Java -
Click on the
Importstab to set the order-
For
Class count to use import with '*'andNames count to use static import with '*': Set to999to prevent IntelliJ from contracting the import statements -
For
Import Layout: The order isimport static all other imports,import java.*,import javax.*,import org.*,import com.*,import all other imports. Add a<blank line>between eachimport
-
Optionally, you can follow the UsingCheckstyle.adoc document to configure Intellij to check style-compliance as you write code.
1.4.2. Updating documentation to match your fork
After forking the repo, the documentation will still have the SE-EDU branding and refer to the se-edu/addressbook-level4 repo.
If you plan to develop this fork as a separate product (i.e. instead of contributing to se-edu/addressbook-level4), you should do the following:
-
Configure the site-wide documentation settings in
build.gradle, such as thesite-name, to suit your own project. -
Replace the URL in the attribute
repoURLinDeveloperGuide.adocandUserGuide.adocwith the URL of your fork.
1.4.3. Setting up CI
Set up Travis to perform Continuous Integration (CI) for your fork. See UsingTravis.adoc to learn how to set it up.
After setting up Travis, you can optionally set up coverage reporting for your team fork (see UsingCoveralls.adoc).
| Coverage reporting could be useful for a team repository that hosts the final version but it is not that useful for your personal fork. |
Optionally, you can set up AppVeyor as a second CI (see UsingAppVeyor.adoc).
| Having both Travis and AppVeyor ensures your App works on both Unix-based platforms and Windows-based platforms (Travis is Unix-based and AppVeyor is Windows-based) |
1.4.4. Getting started with coding
When you are ready to start coding,
-
Get some sense of the overall design by reading Section 2.1, “Architecture”.
-
Take a look at [GetStartedProgramming].
2. Design
2.1. Architecture
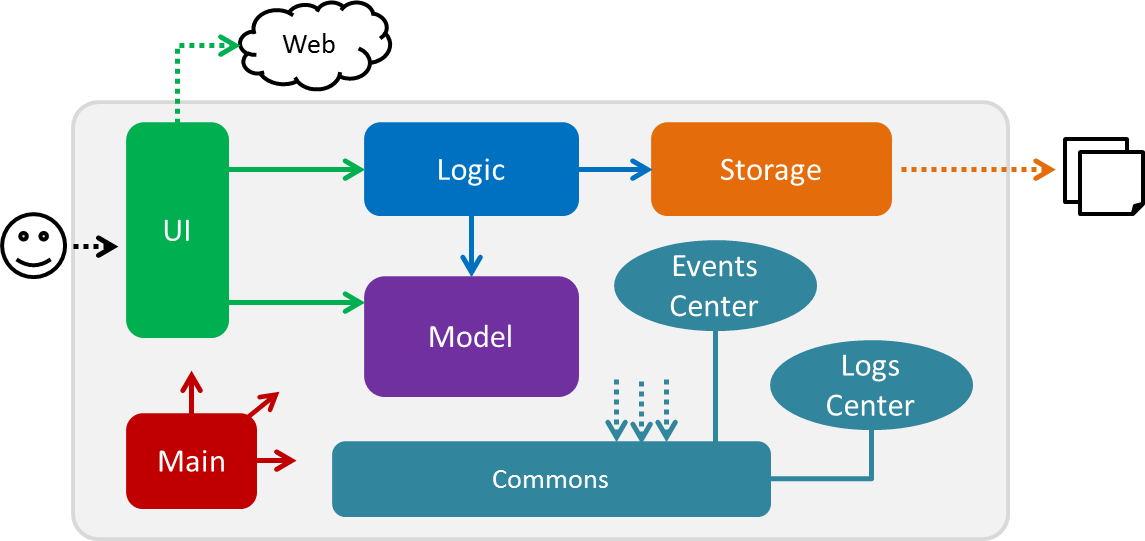
The Architecture Diagram given above explains the high-level design of the App. Given below is a quick overview of each component.
The .pptx files used to create diagrams in this document can be found in the diagrams folder. To update a diagram, modify the diagram in the pptx file, select the objects of the diagram, and choose Save as picture.
|
Main has only one class called MainApp. It is responsible for,
-
At app launch: Initializes the components in the correct sequence, and connects them up with each other.
-
At shut down: Shuts down the components and invokes cleanup method where necessary.
Commons represents a collection of classes used by multiple other components. Two of those classes play important roles at the architecture level.
-
EventsCenter: This class (written using Google’s Event Bus library) is used by components to communicate with other components using events (i.e. a form of Event Driven design) -
LogsCenter: Used by many classes to write log messages to the App’s log file.
The rest of the App consists of four components.
Each of the four components
-
Defines its API in an
interfacewith the same name as the Component. -
Exposes its functionality using a
{Component Name}Managerclass.
For example, the Logic component (see the class diagram given below) defines it’s API in the Logic.java interface and exposes its functionality using the LogicManager.java class.
Events-Driven nature of the design
The Sequence Diagram below shows how the components interact for the scenario where the user issues the command deleteUser.
It is assumed that the user has already logged in to his/her account EventOrganiser.
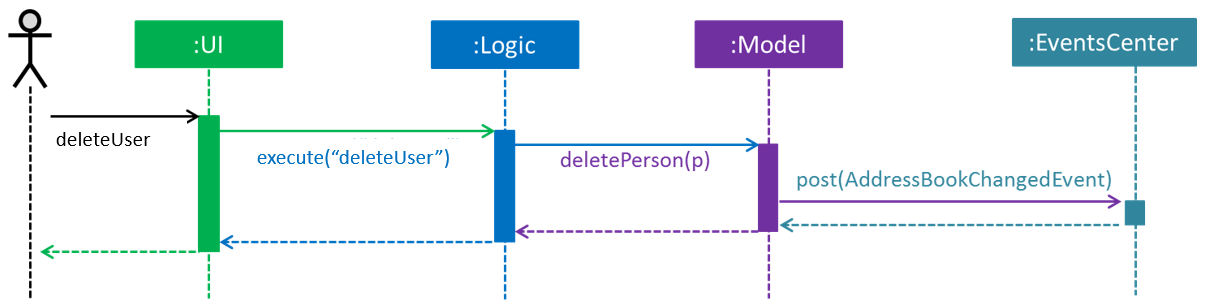
deleteUser command (part 1)
Note how the Model simply raises a AddressBookChangedEvent when the Address Book data are changed, instead of asking the Storage to save the updates to the hard disk.
|
The diagram below shows how the EventsCenter reacts to that event, which eventually results in the updates being saved to the hard disk and the status bar of the UI being updated to reflect the 'Last Updated' time.
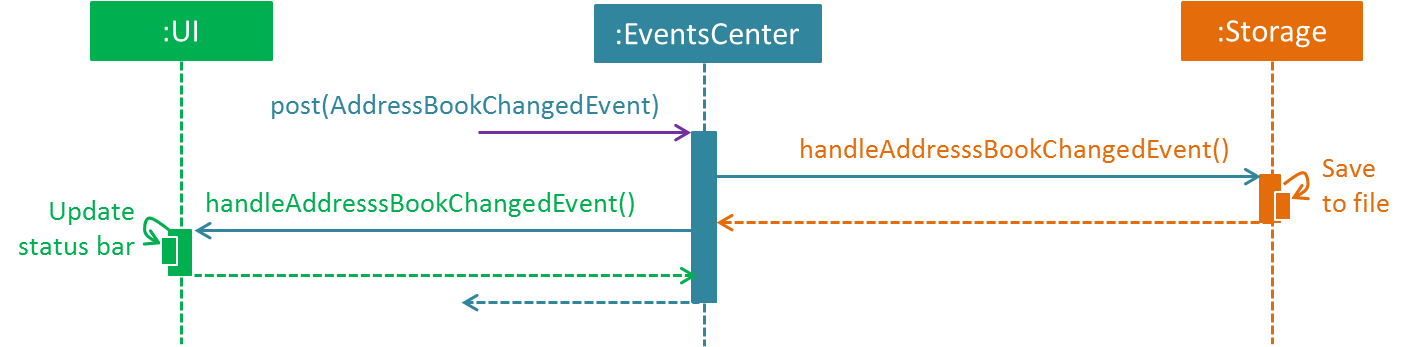
deleteUser command (part 2)
Note how the event is propagated through the EventsCenter to the Storage and UI without Model having to be coupled to either of them. This is an example of how this Event Driven approach helps us reduce direct coupling between components.
|
The sections below give more details of each component.
2.2. UI component
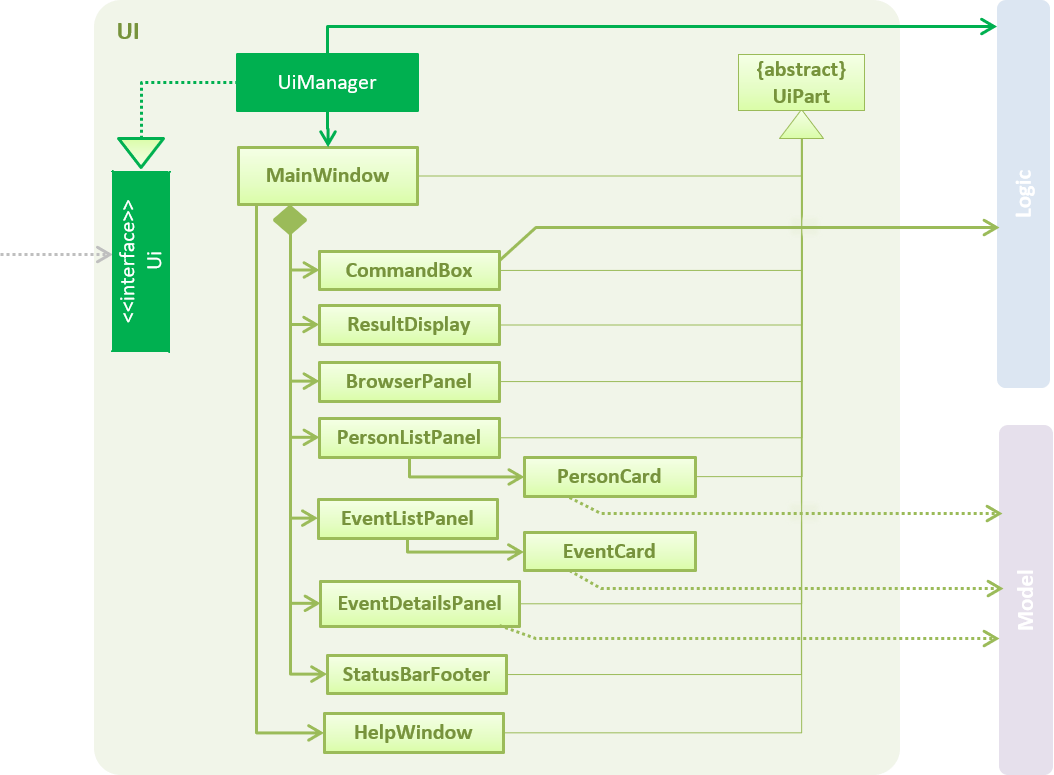
API : Ui.java
The UI consists of a MainWindow that is made up of parts e.g.CommandBox, ResultDisplay, PersonListPanel, EventDetailsPanel, StatusBarFooter, BrowserPanel etc. All these, including the MainWindow, inherit from the abstract UiPart class.
The UI component uses JavaFx UI framework. The layout of these UI parts are defined in matching .fxml files that are in the src/main/resources/view folder. For example, the layout of the MainWindow is specified in MainWindow.fxml
The UI component,
-
Executes user commands using the
Logiccomponent. -
Binds itself to some data in the
Modelso that the UI can auto-update when data in theModelchange. -
Responds to events raised from various parts of the App and updates the UI accordingly.
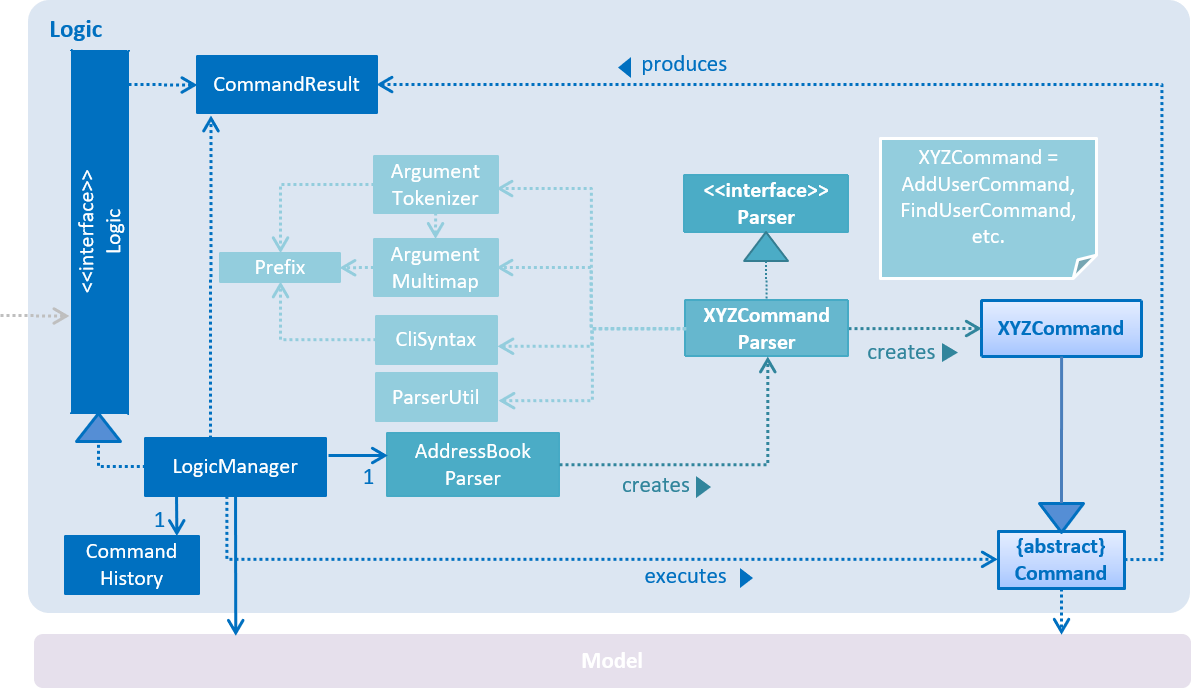
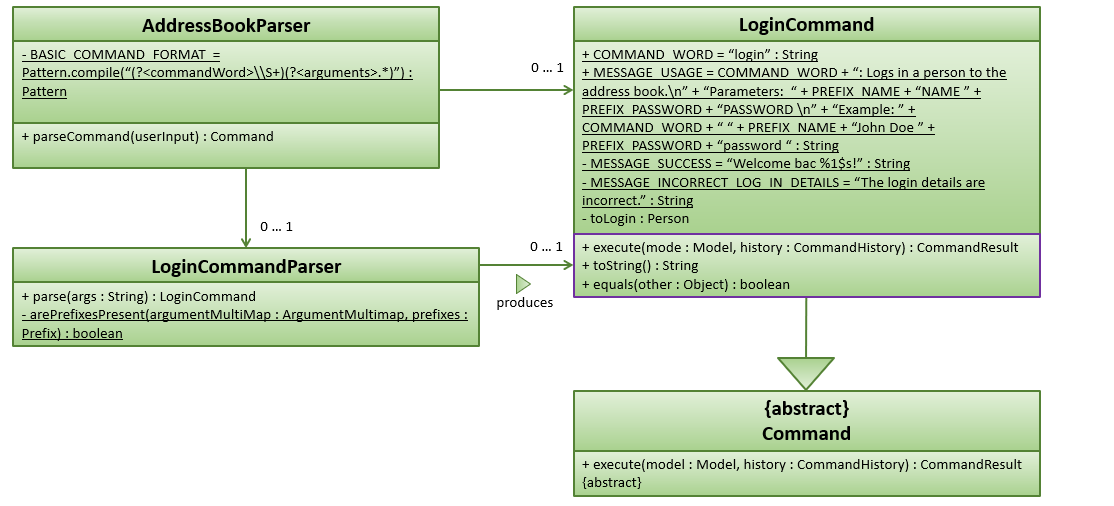
2.3. Logic component
API :
Logic.java
-
Logicuses theAddressBookParserclass to parse the user command. -
This results in a
Commandobject which is executed by theLogicManager. -
The command execution can affect the
Model(e.g. adding a person) and/or raise events. -
The result of the command execution is encapsulated as a
CommandResultobject which is passed back to theUi.
Given below is the Sequence Diagram for interactions within the Logic component for the execute("deleteUser") API call.
Once again, note that we have assumed that the user has already logged in to his/her account in EventOrganiser.

deleteUser Command.2.4. Model component
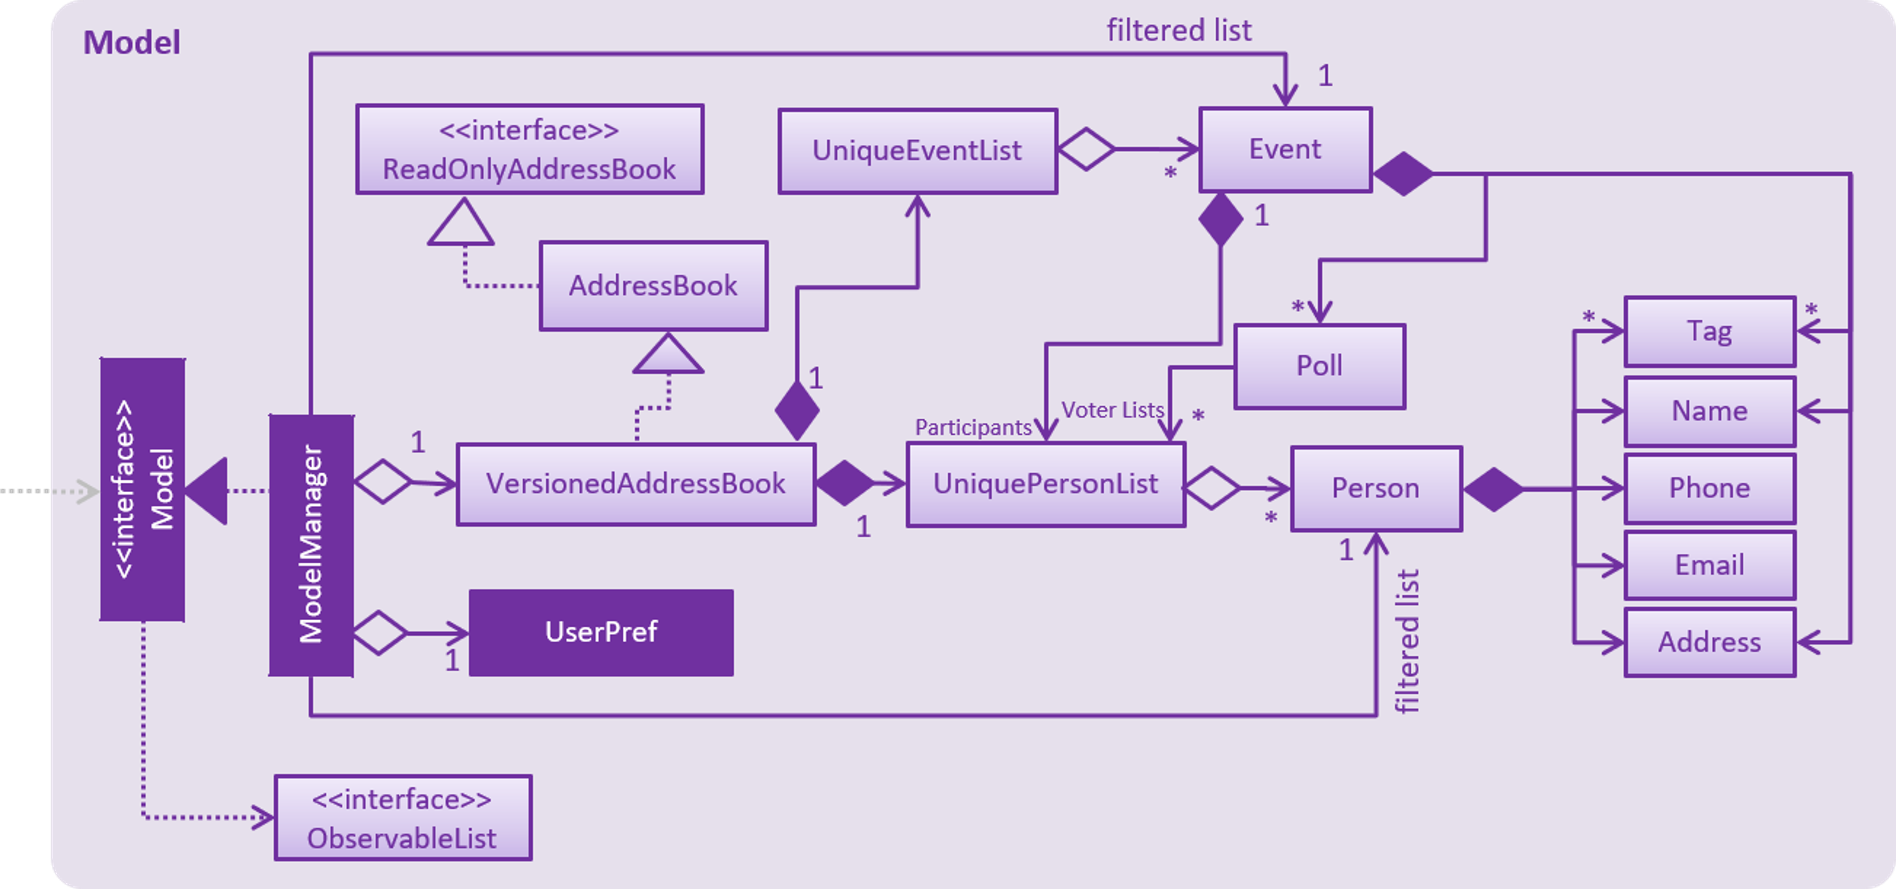
API : Model.java
The Model,
-
stores a
UserPrefobject that represents the user’s preferences. -
stores the EventOrganiser data.
-
exposes an unmodifiable
ObservableList<Person>andObservableList<Event>that can be 'observed' e.g. the UI can be bound to this list so that the UI automatically updates when the data in the list change. -
does not depend on any of the other three components.
The Event class contains attributes which depend on the Person and UniquePersonList classes. These are the event organiser (Person), the list of participants (a UniquePersonList). Each event also contains a list of polls, which contains a voter list for each option, which is a UniquePersonList.
As a more OOP model, we can store a Tag list in Address Book, which Person can reference. This would allow Address Book to only require one Tag object per unique Tag, instead of each Person needing their own Tag object. An example of how such a model may look like is given below.
|
2.5. Storage component
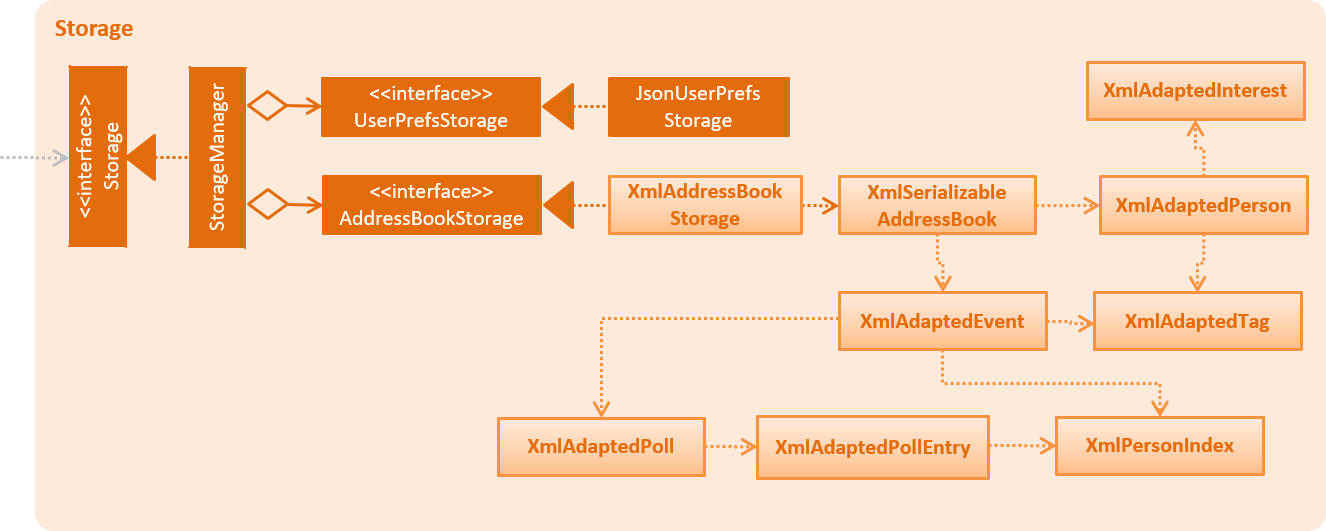
API : Storage.java
The Storage component,
-
can save
UserPrefobjects in json format and read it back. -
can save EventOrganiser data in xml format and read it back.
Each event contains references to persons in the list of persons in the EventOrganiser. The storage component stores these people in the form of XmlPersonIndex objects, which are constructed from the index of the person as it is stored in EventOrganiser. When converting XmlAdaptedEvent objects back to a model type Event object, the XmlPersonIndex must be converted to the corresponding person in the EventOrganiser person list.
2.6. Common classes
Classes used by multiple components are in the seedu.addressbook.commons package.
3. Implementation
This section describes some noteworthy details on how certain features are implemented.
3.1. Login/Logout feature
3.1.1. Current Implementation
The goal of this section is to explain the implementation of the login/logout feature.
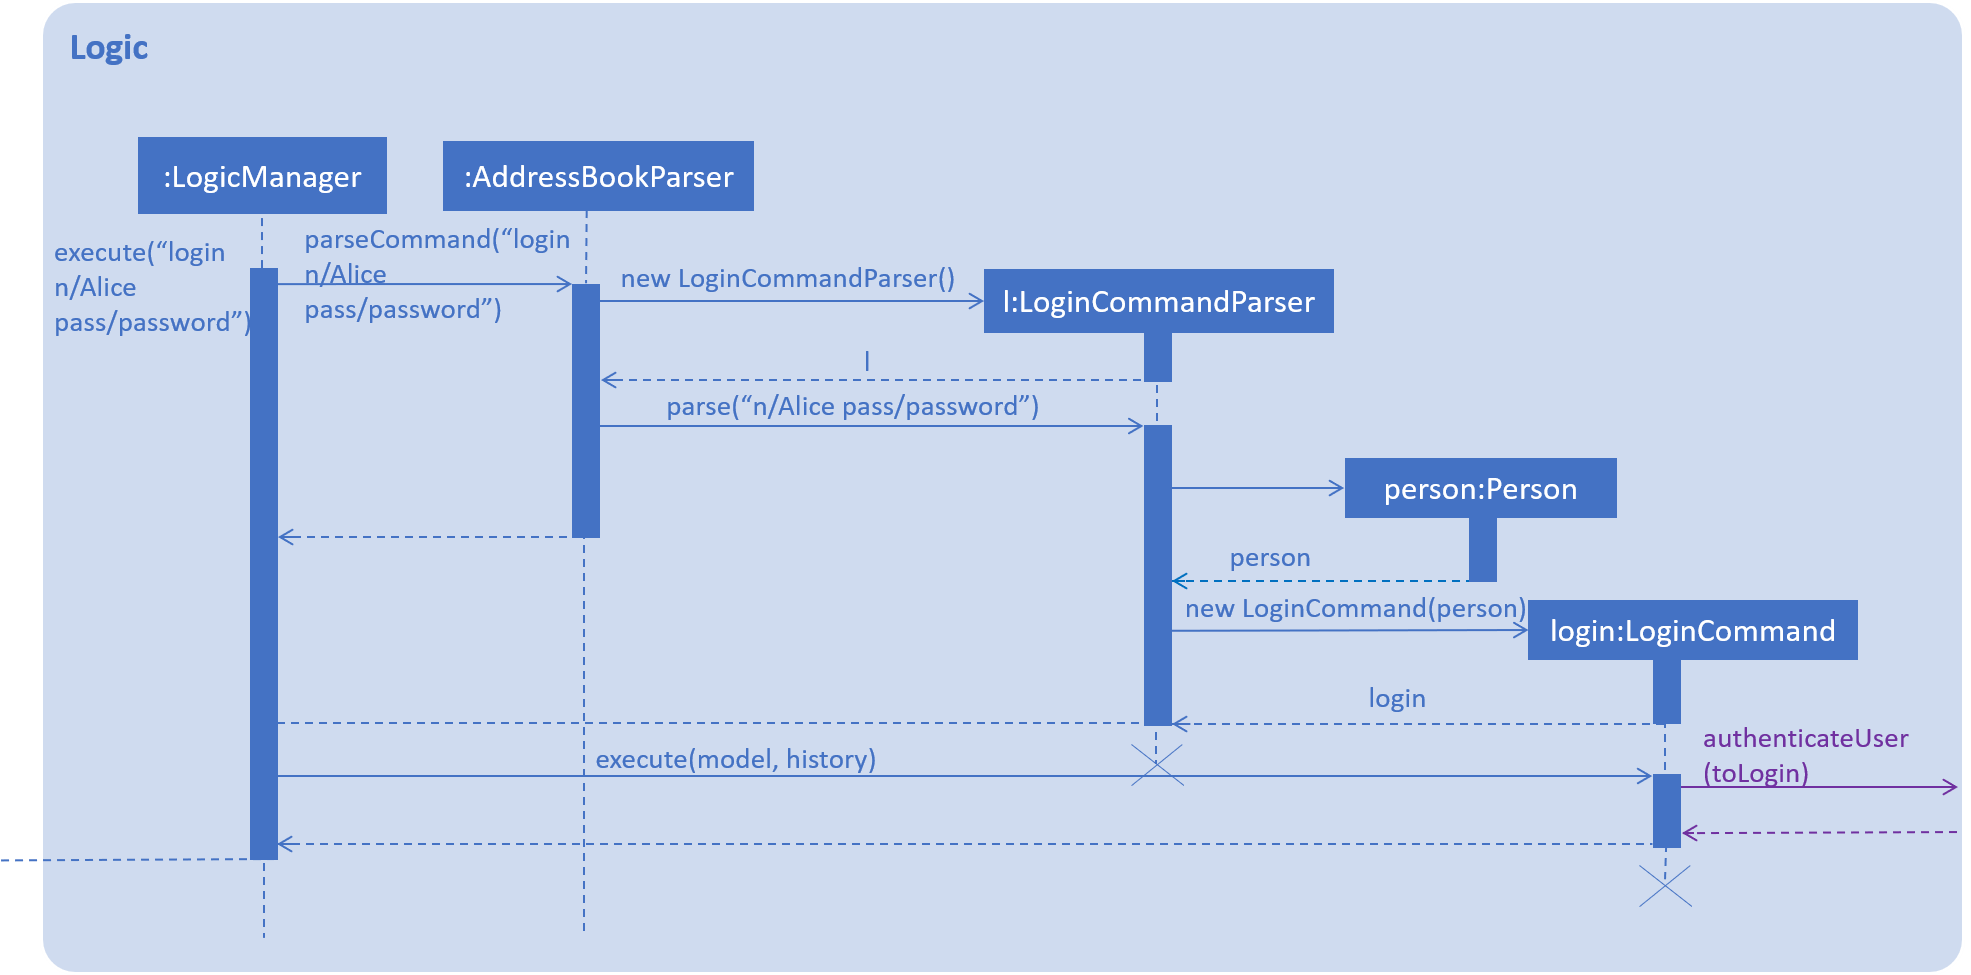
login n/Alice pass/password command.We have assumed that a user with name as "Alice" and password as "password" already exists in Event Organiser. If such an user does not already exist before the login command is issued, login will not be successful. In this implementation, we define the uniqueness of a user by its tuple of NAME and PASSWORD. No two users can have the same NAME and PASSWORD pair. If two users have the same name, then they will have to use different passwords.
When the execute() method of the Login command is called, the login command authenticates the user using the autheneticateUser() method from the model component i.e. checks that the user that is trying to logging actually exists in EventOrganiser. A CommandException will be thrown in the following 2 scenarios:
-
When the user does not exist in EventOrganiser.
-
When there is already a user that is logged in.
On the other hand, when the execute() method of the Logout command is called, a CommandException will be thrown when there isn’t any user that is logged in.
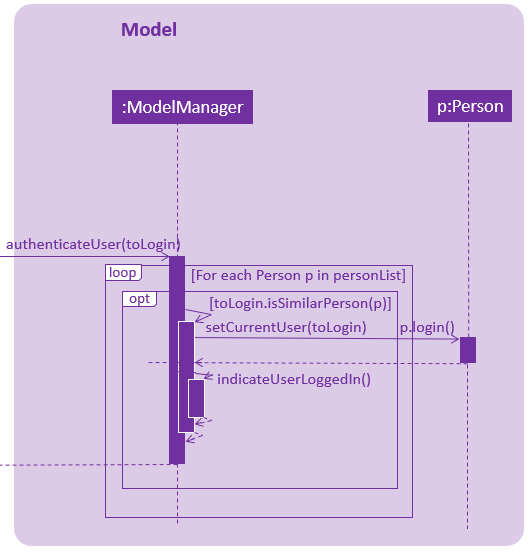
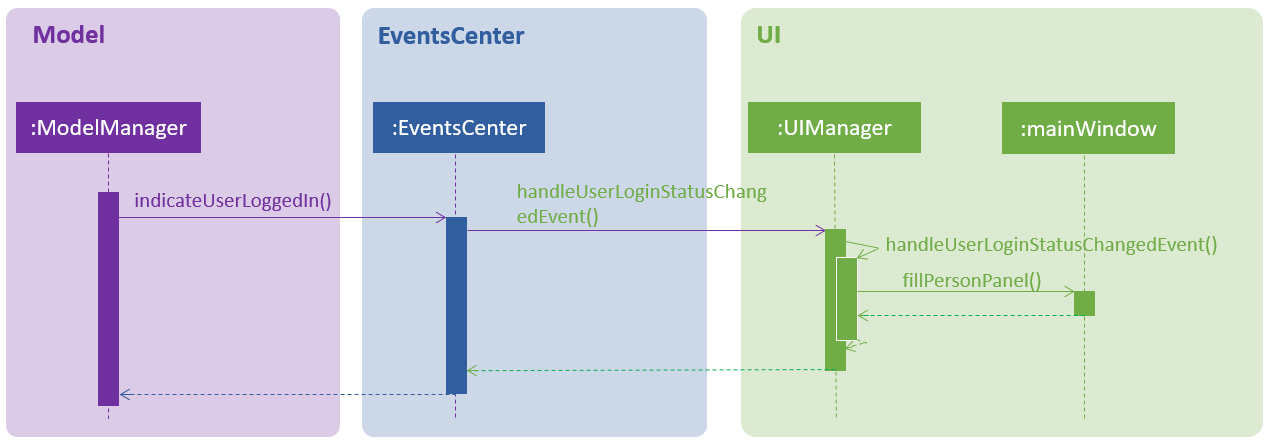
login n/Alice pass/password command.After a user logs in or logs out, the modelManager will raise an UserIsLoginStatusChangedEvent to update the UI.
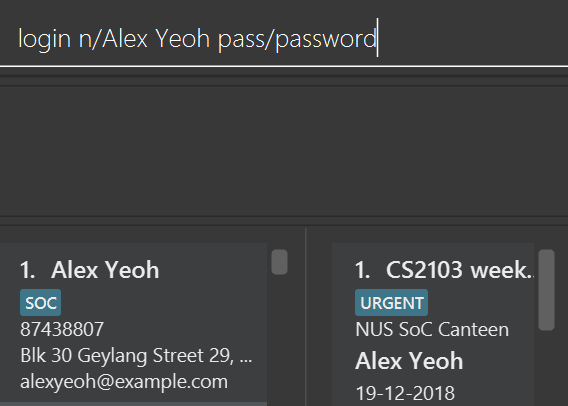
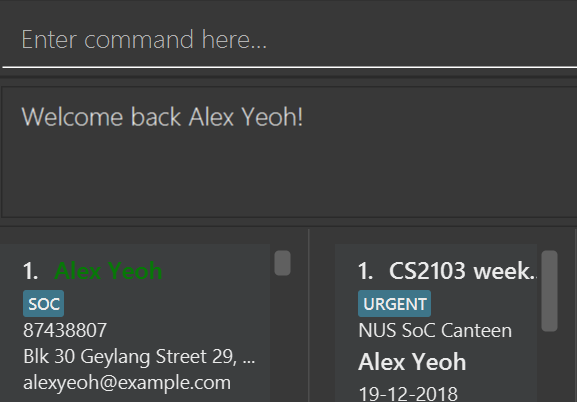
login n/Alice pass/password command.There are 2 indications that login was successful. First, a welcome message will be shown with the a message in the format: "Welcome back [NAME]!" where [NAME] is replaced by the full name of the user. For example, if the user, Alex Yeoh, successfully logs in to his account, he should see the welcome message: "Welcome back Alex Yeoh!". Second, upon successful login the colour of the name of the user will change from white to green. The two images below attempts to illustrate the effects of a successful login on the UI. Again, we will use the scenario that a user, Alex Yeoh, wants to login to his account. Alex enters his name and password as required by the login command.
Once Alex Yeoh successfully logs in, the UI will automatically be updated as shown below
Note that some minute details for the Logic component where omitted for the sake of simplicity.
3.1.2. Design Considerations
Aspect: Security
-
Alternative 1(Current implementation) : In the current implementation, we need to uniquely identify an user using both their name and password. If two users have different names, they will be different users. Even if two users have the same name, they can simply choose different passwords for both users to use EventOrganiser.
-
Pros: Fairly easy to implement
-
Cons: Fairly easy for a malicious user to login to another user’s account. However, the problem arises when a malicious user wants to login to other user’s account. This can be achieved fairly simply using the login command. The malicious user can look for the name of the user that already has an account, and brunt force their way in, especially if the password is weak. Similar technique can be used using the EditUser command to comprise the integrity of another users account.
-
-
Alternative 2 : Implement login command with one-time passwords.
-
Pros: High level of security
-
Cons: Highly difficult to implement
-
3.2. Poll feature
3.2.1. Current implementation
This section explains the implementation of the features associated with the Poll class of each Event while detailing some implementation details of the Event class. The relevant commands which are callable by the user to be discussed are:
-
AddPollCommand- adds a new Poll to the event given the name of the poll to be created. -
AddPollOptionCommand- adds a new poll option to the poll given the poll index and the name of the option to be added. -
VoteCommand- adds the current user as a voter to the voter list of the given option. -
AddTimePollCommand- creates a new TimePoll automatically populated with options based on the schedules of the event participants.
For all the above commands, the event must first be selected using the selectEvent command, which will set the currentEvent through the Model#setSelectedEvent() method.
This is done to ensure that users do not have to continually specify the event for which the Poll commands are called for every command.
This is on top of the currentUser in the Model which was already selected through the LoginCommand.
There are two types of Polls which extends from the abstract class AbstractPoll: Poll and TimePoll.
Each AbstractPoll object contains a pollData attribute which is stored as a HashMap<String, UniquePersonList>.
The pollData stores each option as a string and the list of voters to that particular option as a UniquePersonList.
As can be seen in the class diagram, AbstractPolls also include a unique ID to identify the poll and a poll name.
They also support the adding of votes by participants who have joined the event, and the display of the poll details, including the most popular options.
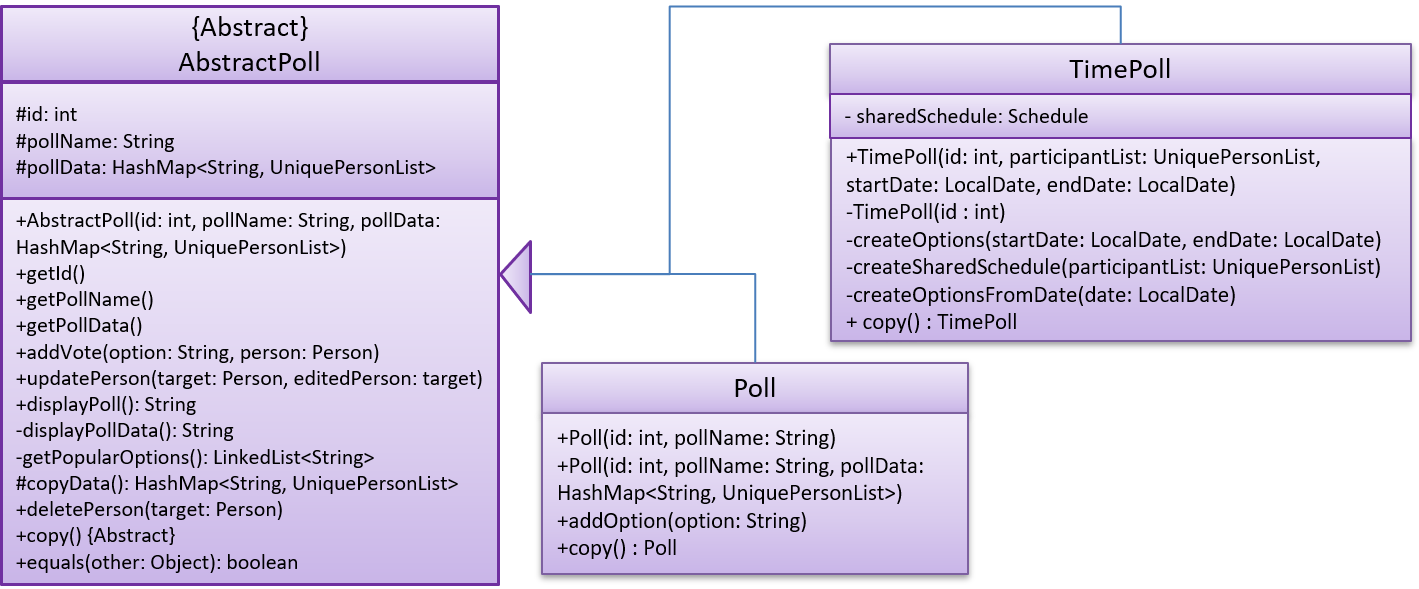
The TimePoll class extends from the abstract AbstractPoll class which is constructed by calling the AddTimePollCommand.
This command automatically generates a list of 30 minute time slots based on the schedules of the persons on the event invite list,
and a specified date range in the user input. The two dates must not be more than a month apart.
The TimePoll shares most of its functionality with Poll, except that users may not add new options. The TimePoll does not automatically update when new event participants join the event. This is done in order to present existing votes for certain options being removed when additional participants join the event. Hence, the event organiser must wait for all participants to be confirmed before adding a TimePoll.
When storing the Poll object in the Storage component, since the XML format does not support the HashMap format,
each entry of the HashMap must be converted to a XmlAdaptedPollEntry.
Each XmlAdaptedPollEntry contains the option as a String as well as a list of XmlPersonIndex objects,
which serve as pointers to the actual Person objects stored in EventOrganiser.
Hence, when the EventOrganiser data is retrieved from storage, the Persons in the list of voters for each option, as well as the Persons in the event participant list,
refer to the same Person objects in the list of users of the EventOrganiser.
This ensures that when a user is edited or deleted, they are updated or deleted in the poll details accordingly.
This functionality is supported by the AbstractPoll#updatePerson() and AbstractPoll#deletePerson() methods.
As an example, the following sequence diagram illustrates the workings of the VoteCommand.
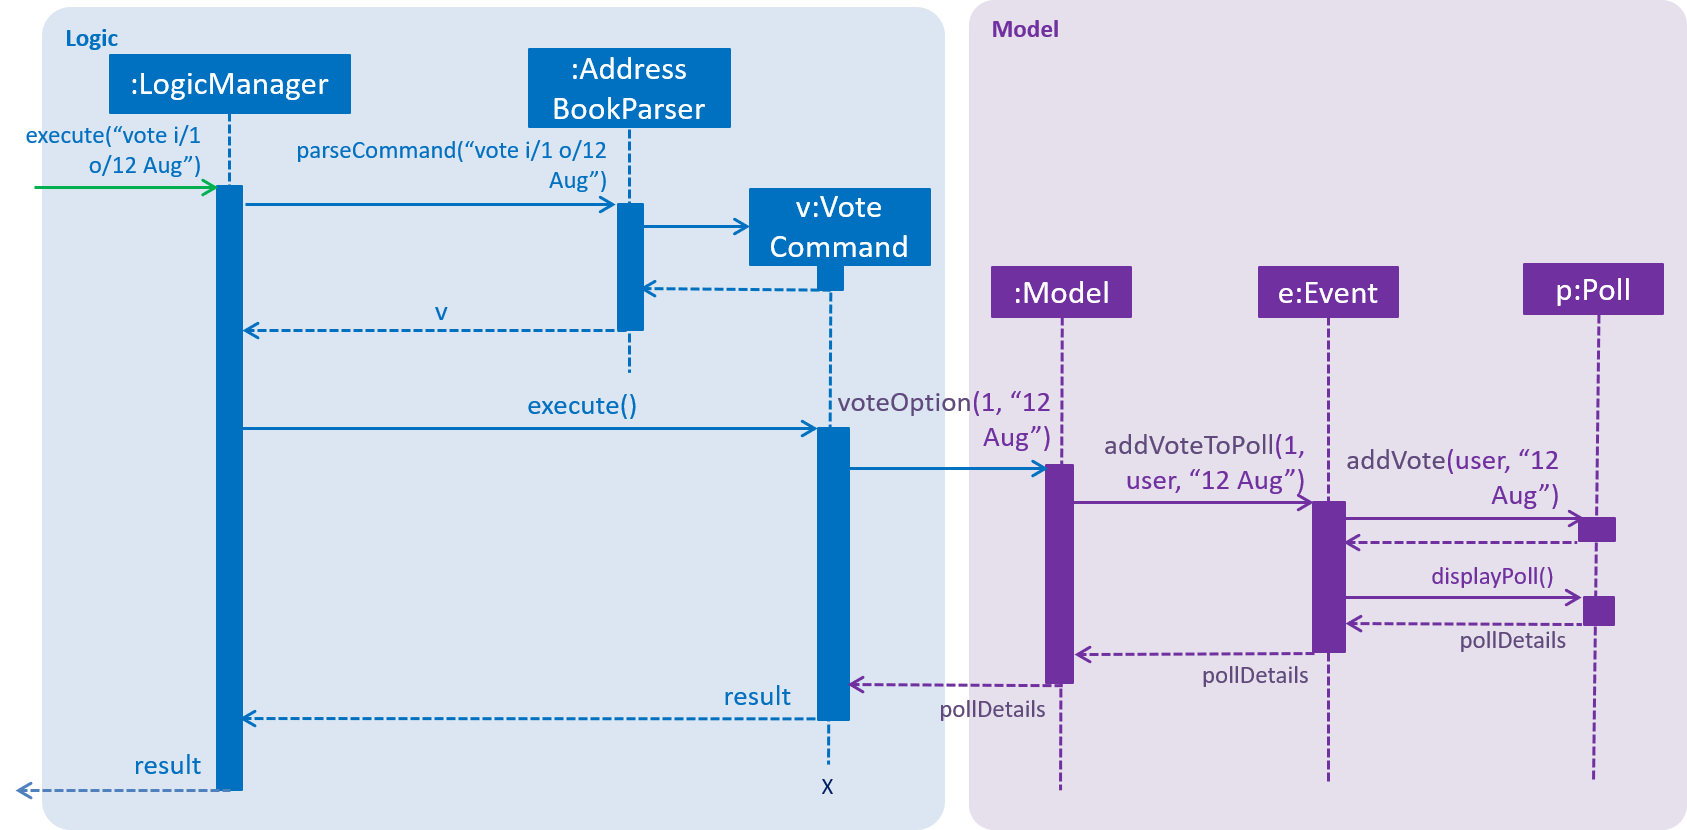
As stated above, since Model already stores the current user and the selected event from prior user commands,
the Model can call the correct Event e and currently logged-in user in the addVoteToPoll method. If there is no logged-in user,
a NoUserLoggedInException is thrown, and if there is no selected event, a NoEventSelectedException is thrown.
In addition, four other possible exceptions might be thrown by the VoteCommand:
-
A user must have already joined the event as a participant, or be on the invite list in order to vote, failing which, a UserNotJoinedEventException is thrown.
-
A user must not already have voted for that particular option in the poll already. This is enforced by the UniquePersonList, which throws a DuplicatePersonException if someone tries to vote twice.
-
A poll must exist at the given poll index for the selected event, else, an IndexOutOfBoundsException is thrown.
-
The given option must exist in the selected poll, else, an IllegalArgumentException is thrown.
The other commands AddPollCommand and AddPollOptionCommand follow a very similar structure.
The sequence diagram within the model for the AddPollCommand is illustrated here:
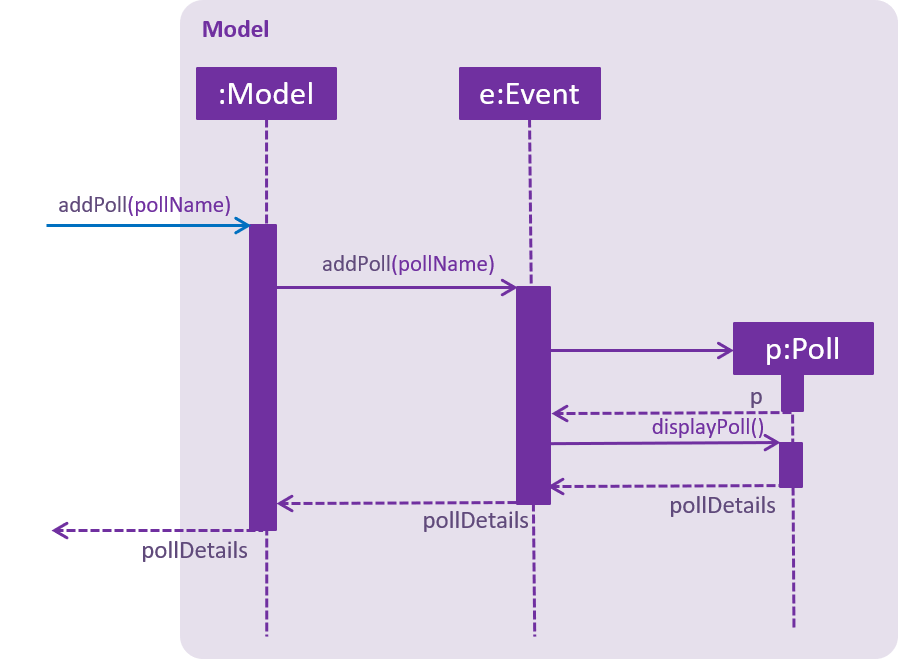
In all cases, the contents of the poll is returned to the calling Command object as String through the Poll#displayPoll() method.
The displayed details of the poll contains the most popular options, computed using the Poll#getPopularOptions() method.
This method returns an empty list if no user has voted for any option yet, i.e. if the most popular option has no voters.
A new DisplayPollEvent is then posted to the EventsCenter, which is handled by the PollDisplayPanel in the UI component.
3.2.2. Design considerations
Aspect: The relationship between Poll and TimePoll
-
Alternative 1 (Current implementation): Design them as separate classes which both inherit from an abstract
AbstractPollclass.-
Pros: Allows for future extendability from the AbstractPoll class eg additional types of Polls (location, date) which constrain the option types and include additional features to recommend the best option eg most convenient location by distance for participants.
-
-
Alternative 2: Allow
TimePollto extend from thePollclass.-
Pros: The two classes differ only in that
TimePollhas the augmented feature of generating options from the schedule of event participants. -
Cons: Unable to constrain the input and prevent users from adding the wrong format for options into
TimePoll, since this would violate the Liskov Substitution Principle.
-
Aspect: Storage of voters in Poll
-
Alternative 1 (Current implementation): Store the voters as Persons.
-
Pros: All information about the voters are stored. This also allows the application to distinguish between two users of the same name. Future extensions to the application might also require additional details about the voters.
-
Cons: Need for complete reference to the actual person via the XmlPersonIndex class in storage, rather than duplicating the person details. The voter list must also be manually updated every time the person details are updated.
-
-
Alternative 2: Store only the names of voters.
-
Pros: No need for complete reference to the actual person via the XmlPersonIndex class in storage.
-
Cons: Some persons might share the same name. It is also not extendable for future versions where the data/attributes of the voters might be relevant to computing the best option.
-
3.3. Schedule feature
3.3.1. Current implementation
This section explains the implementation of the features associated with the Schedule class of each schedule while detailing some implementation details of the Schedule class. The relevant commands which are callable by the user to be discussed are:
EditUserCommand - The base Edit command for person with one additions - Schedule Update parameter
MaxScheduleCommand - Compare two or more persons' schedules and return the common free time.
3.3.2. Design considerations
For EditCommand, despite the fact that schedule piggybacks off the original edit command, the original person did not include a schedule object, and so adjustments have to be made. Firstly, if the person does not have the schedule object, a new schedule object would be created by the logic layer. This is to ensure backwards compatibility with past test cases without schedule objects. Next, the schedule needs to be stored in the xml file in a concise way so that it would not be bloated. As the persons in the applications are students, we can be certain that their schedules will be likely the same through the week, thus only the weekly schedule is stored.
Aspect: Storage of schedule in person
-
Alternative 1 Store all schedule as a slot just like how a calendar does, which includes day, time, etc.
-
Pros: All information about the schedule are stored.
-
Cons: Expensive storage as a lot of data needs to be stored. Management of schedule may become an issue here if the schedule needs to store for more than a year worth.
-
-
Alternative 2: (current implementation) Store weekly schedule
-
Pros: Cheap storage as only a subset of schedule needs to be stored. Possible O(1) access times.
-
Cons: Explicit details of the schedule may be lost such as an event that appears only once a year.
-
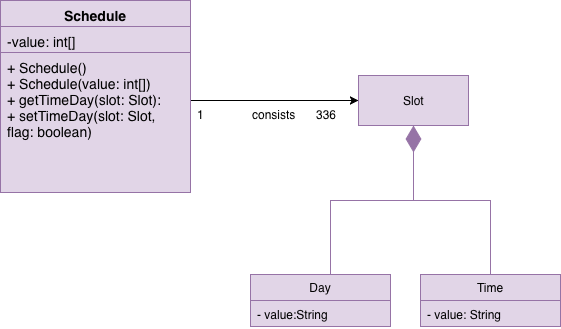
We have chosen the second option for the ease of storage management and low access times. To store the schedule, a unique approach of using bit counters is used. Each bit stores a 30 minute block, totalling to 24 hours * 2 30-mins * 7 days = 336 bits. 1-bit signifies an occupied slot while a 0-bit signifies an empty slot. This 336 bit-string is then stored as a string in the xml. However, in the application, it will stored as a two-dimensional array [7][48]. This allows O(1) access times for each slot, while only requiring O(n) on startup to reload the bit-string into an array.
Each bit string is then translated into a Slot, detailing its time of the day and the day of the week, to be used by the application
As manipulating bit strings may be complicated, getter, setter and merger methods are provided for any external access to the schedule. This allows easy use of the specific slots in the schedule without heavy calculation and memorisation of bits.
-
Schedule has a copy constructor to create duplicates for the schedule objects. Useful for any commands that manipulate schedule objects.
-
Note that schedule only takes in Slots as an argument for its methods. Slot consists of a Time object and a Day object. This is to ensure Separation of Concerns in the schedule manipulation as schedule does not need to be ensure that the argument input is valid; The Time and Day objects will ensure the validity of values.
-
All commands that feed input into schedule should also validate the data input. In the event such data is not sanitised, defensive programming has been employed in Day and Time to deny the data.
Aspect: Schedule Update
To effect a schedule update, a pair of strings representing the time of the day and the day of the week are to be entered. The strings are then converted into a Slot(which contains Time and Day objects). The setter methods of schedule is then called to effect the change. Note that this is a "bit flip" operation, so it will set a free Slot to an occupied Slot and vice versa.
Aspect: MaxSchedule Command
Similarly, as bitwise operations are allowed, two or more persons' schedule are or-ed together to form a new schedule object. This Schedule object is then translated into slots and print back to the application.
Noted that we have 336 Slots thus it is highly possible that maxSchedule command will return a large number of free time slots. Thus the sl/ tag is used to limit the range of free time displayed. It is implemented in the format of XXXX-XXXX where XXXX is the time slot in 24 hour format.
The sequence diagram of MaxSchedule command is illustrated below.
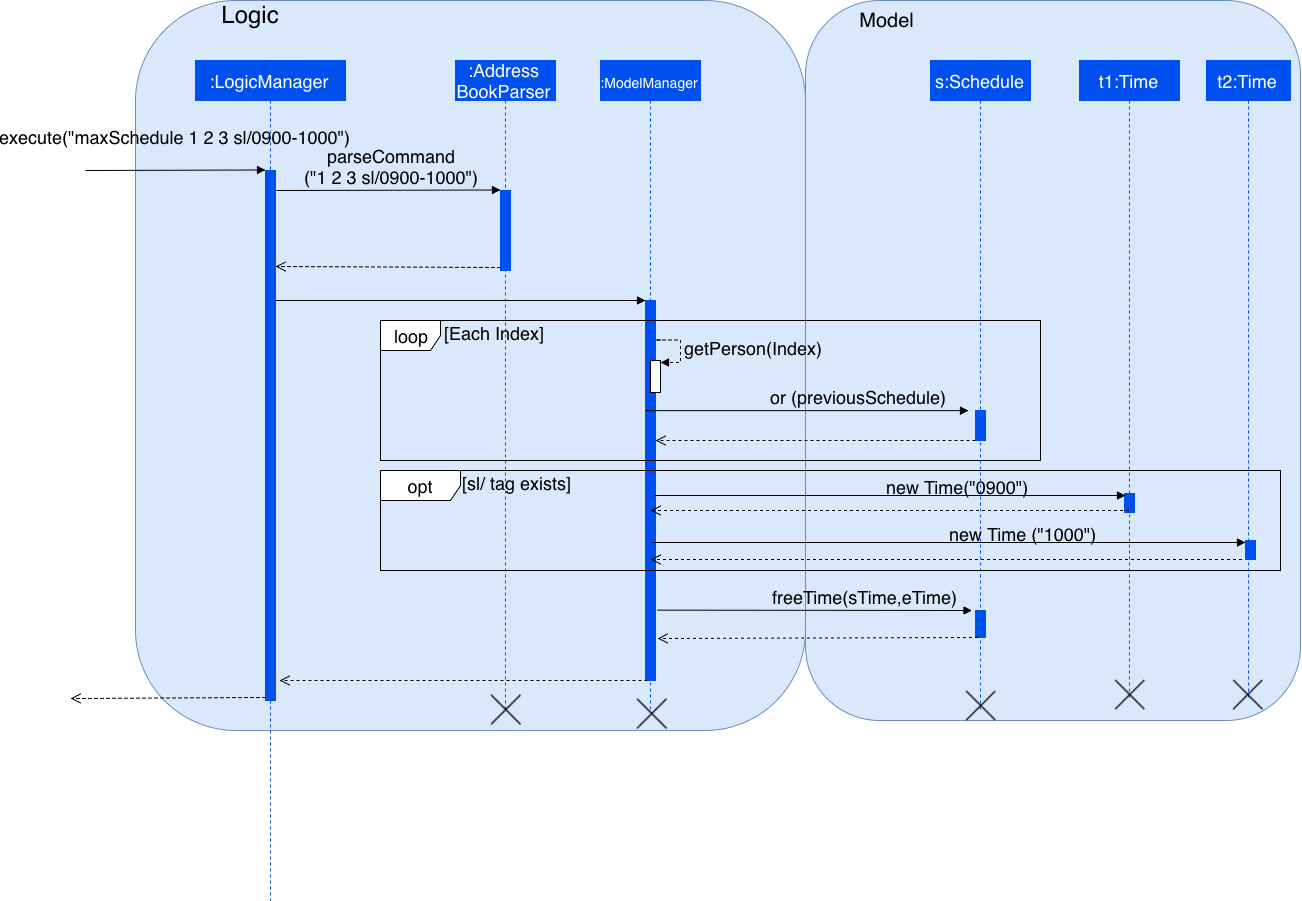
As noted from the schedule component, MaxSchedule command passes a Time object into the schedule. This abstraction of Time/Day objects reduces the possibility of invalid input resulting from the user input in MaxSchedule command.
3.4. TimeTable feature
3.4.1. Current implementation
This section explains the implementation of the features associated with the TimeTableUtil and Timetable class of each TimeTable while detailing some implementation details of the TimeTable and TimeTableUtil class. The relevant commands which are callable by the user to be discussed are:
3.4.2. Design considerations
EditUserCommand - The base Edit command for person with one addition - Timetable parameter
AddUserCommand - The base Add command for person with one addition - Timetable parameter
TimeTable is a collection of data downloaded from an external source, detailing the students' weekly schedule for the semester. This is to allow ease of access for the students, without having them to enter their schedules manually using schedule update parameters in the EditCommand. This timetable is also not stored inside the xml, but rather immediately translated into a schedule object to be passed back to the application, which would store the object inside the model.
Aspect: Timetable Source
-
Alternative 1 Google Calendar
-
Pros: Academic and non-academic calendar events can be downloaded.
-
Cons: Not tailored for NUS students - students must acquire their academic events from their own CORS (NUS module slot bidding) result to populate their own google calendar. Google authorization token (per user) will have to stored securely.
-
-
Alternative 2: (current implementation) NusMod
-
Pros: Academic events can be downloaded. Many students are already using this platform to store their academic events.
-
Cons: Non-academic events cannot be downloaded from this source.
-
NusMods will be used to provide academic events for the student. As for their non-academic events, he can use schedule update to manually update those slots. This way, we will be able to provide the most convenient way for the student to populate the schedule.
Aspect: Timetable Download
As nusmods.com is an external web server, internet access needs to be checked first. Following up, the nusmods.com gives the user a modsn.com shortlink which can translated back to a nusmods.com/… full link, if he wants to share his timetable with himself or others. Finally, a valid nusmods.com timetable would include json data in its GET parameters. All of these must be fulfilled or else a Invalid Nusmods link will be returned to the application.
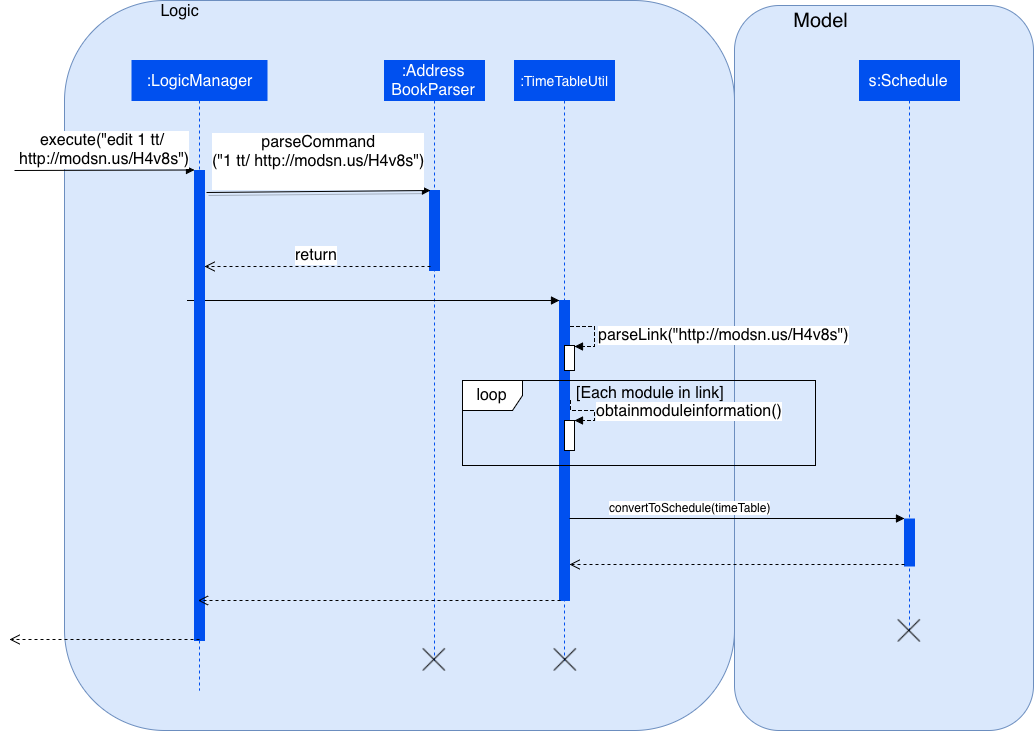
The sequence diagram for the timetable download is illustrated below.
This is the valid short link of the nusmod timetable.
http://modsn.us/H4v8sThe above short link will be parsed into the full nusmods link as followed:
https://nusmods.com/timetable/sem-1/share?CS2102=LEC:1,TUT:11&CS2103=LEC:1,TUT:01&CS2105=LEC:1,TUT:16&CS2106=LAB:09,LEC:1,TUT:09&MA1521=LEC:1,TUT:4&UCV2209=SEM:01Breakdown on how to obtain the full timetable and convert it into a Schedule.
Step 1. We can easily obtain the person’s timetable by splitting the GET parameters by ';' delimiter. The resulting array would contain Module Code /=/ Lesson Type /:/ Number Slot.
Step 2. Then, to obtain the full details of the module (including all lessons and all slots), we can use the NUSMODS API detailed here https://github.com/nusmodifications/nusmods-api.
Step 3. We will then filter out the lessons obtained in step 1 from the full detail in step 2.
Step 4. The filtered lessons is then converted into a list of Slot.
Step 5. The list of Slot will be passed in a Schedule constructor to generate a new Schedule.
Step 6. The new Schedule object is returned to the application.
3.5. Add/Delete Friend feature
3.5.1. Current implementation
This section explains the implementation of the addition/deletion of friends feature associated with each user in EventOrganiser. The relevant commands which are callable by the user to be discussed are:
-
AddFriendCommand- takes in anINDEX, and adds the person specified at theINDEXto the logged-in person’s friend list. -
DeleteFriendCommand- takes in anINDEX,and deletes the person specified at theINDEXfrom the logged-in person’s friend list. -
ListFriendsCommand- takes in anINDEX, and displays all friends of the person specified at theINDEX.
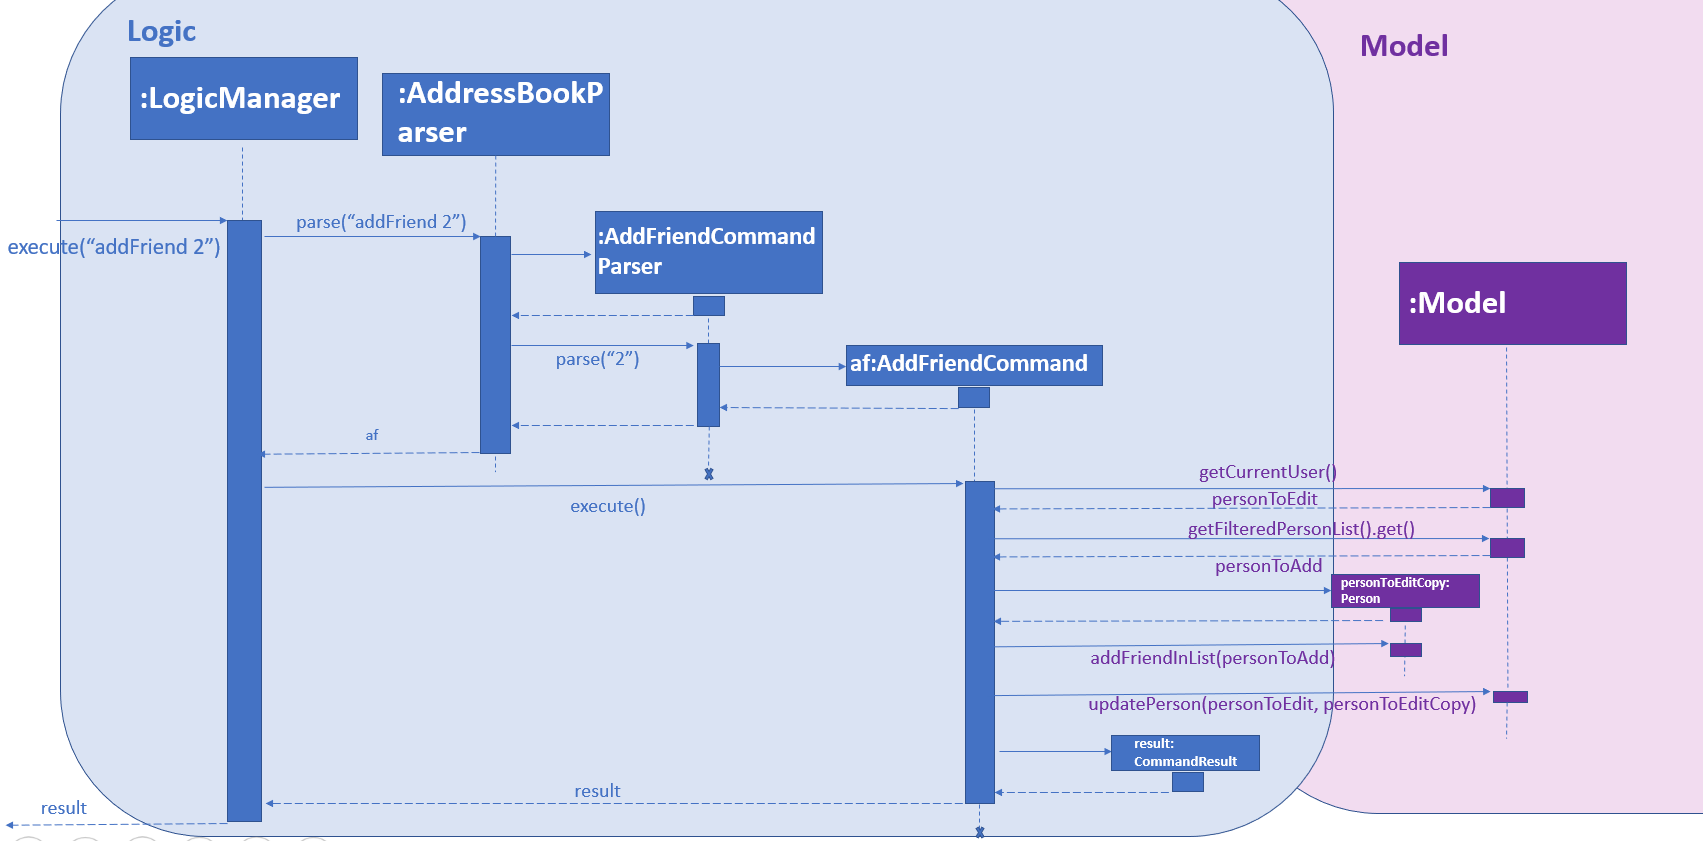
The following sequence diagram for AddFriendCommand is illustrated below:
3.5.2. Design considerations
Aspect: Unilateral friendships
Friendships are unilateral, so if person A is a friend of person B, then person B may not be a friend of person A.
In EventOrganiser, adding a user into the friend list is similar to following someone on Instagram. This is because having a person in your friend list will make it easier for you to be kept updated of his/her details, such as viewing his/her personal particulars or viewing the events that he/she had joined. This is because of the ListFriendsCommand which can display all the friends of the particular user and their details in the display panel as shown below.
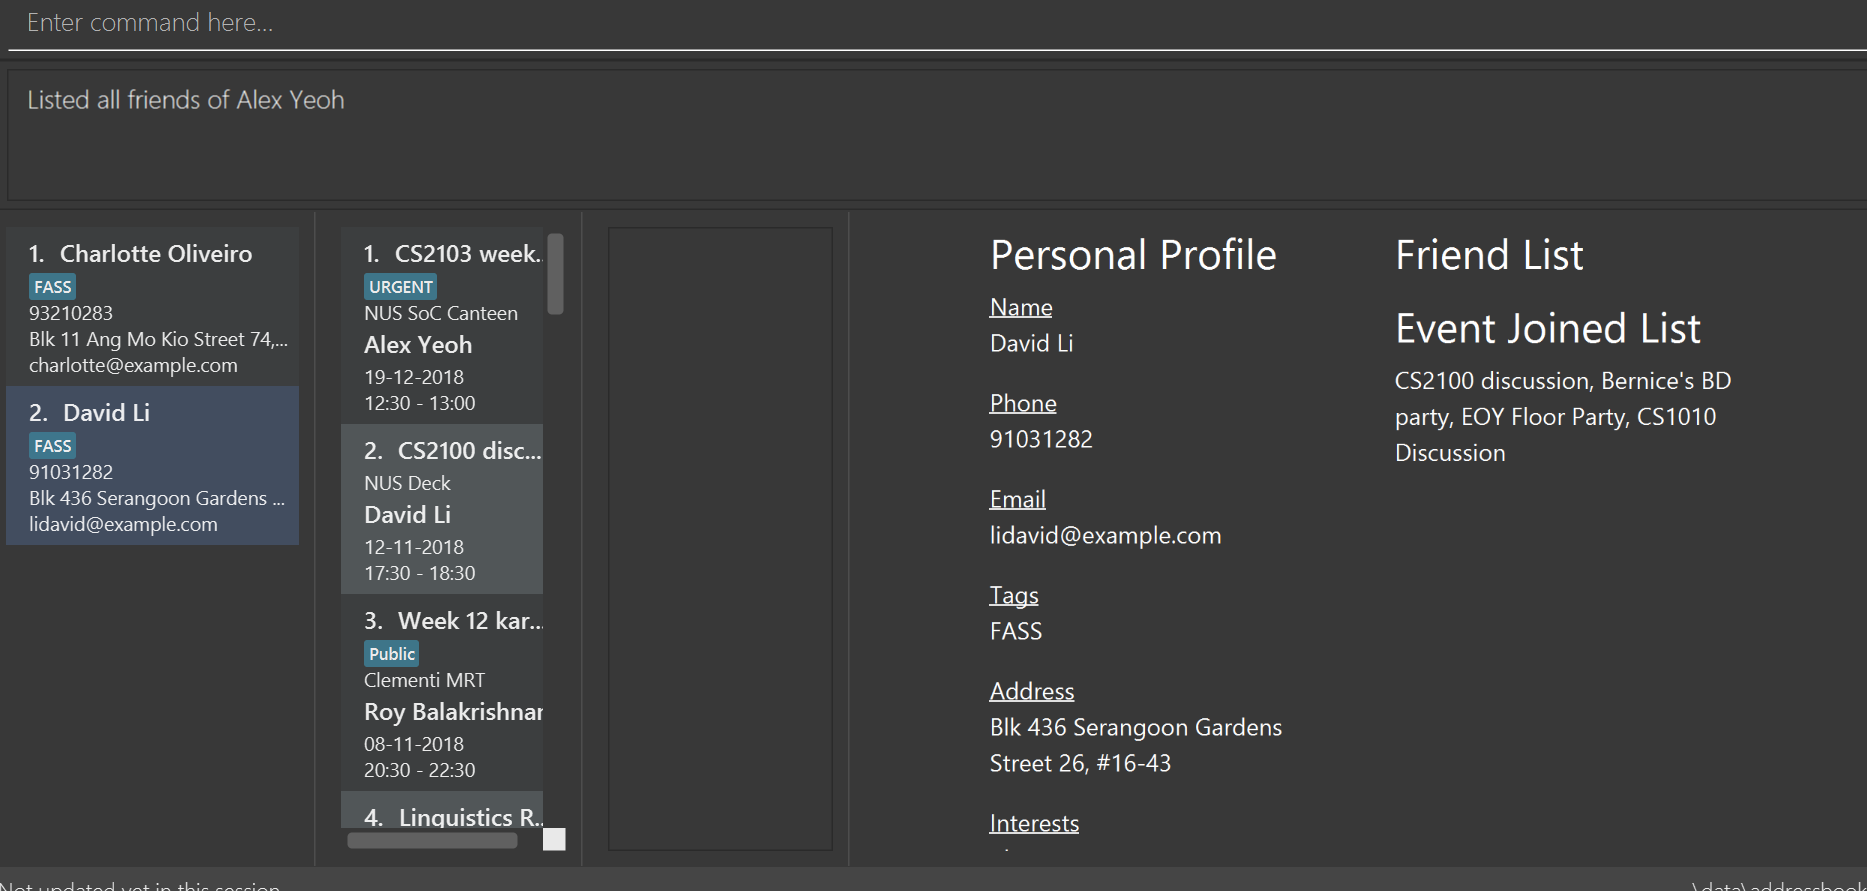
To specify the addition of a user into the logged-in user’s friend list (AddFriendCommand), the index of the user has to be provided. The command format is addFriend INDEX, where INDEX has to be a positive number that is greater than 0, less than or equals to the current greatest index. The INDEX should also not be the current logged-in user himself/herself or someone who is already in his/her friend list. Whereas for DeleteFriendCommand, the INDEX should not be a user who is not currently in his/her friend list.
Aspect: Friend class
Like other attributes, we represents a friend of a Person using a Friend class. The Friend class has a constructor which takes in a Person object, and initializes the string field friendAttributes that combines the 2 attributes that define the uniqueness of a Person (name and password) in string form using a vertical bar(|). Example:
For a person with name Alex Yeoh, password password123, the Friend object’s friendAttributes string field will be Alex Yeoh|password123.
In the Person class, his/her friends will be represented using a Set of Friend objects as the friend list. In the example below, we will describe the procedures when Person A (logged-in user) wants to add Person B (user specified by INDEX) into his/her friend list.
When AddFriendCommand is executed by Person A, once the checking is done (as described in the next aspect), a copy of Person A object will be created. Then the addFriendInList() method from Person class will be called, which creates a Friend object using Person B (as described by the paragraph above) and adds the newly created Friend object into the copy of Person A object’s Set of friends. Finally, the copy of Person A object will replace the original Person A object in the Model using the updatePerson() method from the Model class.
In the display panel where the friend list of a user is displayed, the friend of that user will be identified by the first token of the string field in the Friend object separated by the delimiter '|' (due to the toString() method in Friend class), which is the actual name of the friend.
Aspect: User can only be added as friend once. User can only be deleted as friend if he/she is in the friend list of the logged-in user.
Each person can only be added as a friend once by another person. If Person B is already in the friend list of Person A (logged-in user) and AddFriendCommand is called again Person B, the friend list of Person A will be checked using the hasFriendInList() method in Person class to confirm that Person B is already in the list, thus Person B will not be added into the list again.
Similarly, if Person B is not yet in Person A’s (logged-in user) friend list, and DeleteFriendCommand is called on Person B, the friend list of Person A will be checked using the hasFriendInList() method to confirm that Person B is not in the list, thus no one will be deleted from the list.
Aspect: Deletion/Modification of attributes of a person who is currently on the friend list of another person
The friend lists of each user have to be constantly updated when a user is deleted from the EventOrganiser or his/her attributes are modified (such as change of name).
The following scenario describes what happens if Person B is already on the friend list of Person A.
Person B gets deleted from the Event Organizer:
This triggers the updateFriendListsDueToDeletedPerson() function in the DeleteUserCommand class, which searches through the friend lists of all the other persons. If someone has Person B in their friend list (such as Person A), then Person B will be removed from Person A’s friend list.
Person B’s attributes gets modified (eg change of name):
This triggers the updateFriendListsDueToEditedPerson() function in the EditUserCommand class, which searches through the friend lists of all the other persons. If someone has Person B in their friend list (such as Person A), the original Friend object in Person A’s friend list will be replaced by the new Friend object created using the new attributes of Person B.
3.6. Logging
We are using java.util.logging package for logging. The LogsCenter class is used to manage the logging levels and logging destinations.
-
The logging level can be controlled using the
logLevelsetting in the configuration file (See Section 3.7, “Configuration”) -
The
Loggerfor a class can be obtained usingLogsCenter.getLogger(Class)which will log messages according to the specified logging level -
Currently log messages are output through:
Consoleand to a.logfile.
Logging Levels
-
SEVERE: Critical problem detected which may possibly cause the termination of the application -
WARNING: Can continue, but with caution -
INFO: Information showing the noteworthy actions by the App -
FINE: Details that is not usually noteworthy but may be useful in debugging e.g. print the actual list instead of just its size
3.7. Configuration
Certain properties of the application can be controlled (e.g App name, logging level) through the configuration file (default: config.json).
4. Documentation
We use asciidoc for writing documentation.
| We chose asciidoc over Markdown because asciidoc, although a bit more complex than Markdown, provides more flexibility in formatting. |
4.1. Editing Documentation
See UsingGradle.adoc to learn how to render .adoc files locally to preview the end result of your edits.
Alternatively, you can download the AsciiDoc plugin for IntelliJ, which allows you to preview the changes you have made to your .adoc files in real-time.
4.2. Publishing Documentation
See UsingTravis.adoc to learn how to deploy GitHub Pages using Travis.
4.3. Converting Documentation to PDF format
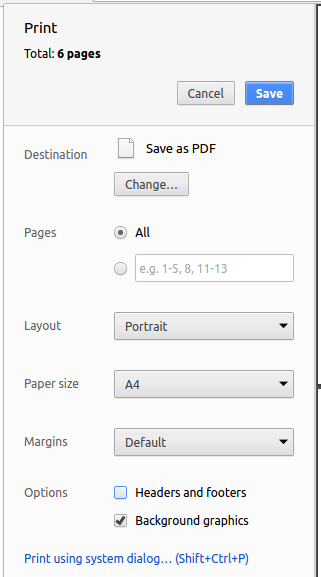
We use Google Chrome for converting documentation to PDF format, as Chrome’s PDF engine preserves hyperlinks used in webpages.
Here are the steps to convert the project documentation files to PDF format.
-
Follow the instructions in UsingGradle.adoc to convert the AsciiDoc files in the
docs/directory to HTML format. -
Go to your generated HTML files in the
build/docsfolder, right click on them and selectOpen with→Google Chrome. -
Within Chrome, click on the
Printoption in Chrome’s menu. -
Set the destination to
Save as PDF, then clickSaveto save a copy of the file in PDF format. For best results, use the settings indicated in the screenshot below.
4.4. Site-wide Documentation Settings
The build.gradle file specifies some project-specific asciidoc attributes which affects how all documentation files within this project are rendered.
Attributes left unset in the build.gradle file will use their default value, if any.
|
| Attribute name | Description | Default value |
|---|---|---|
|
The name of the website. If set, the name will be displayed near the top of the page. |
not set |
|
URL to the site’s repository on GitHub. Setting this will add a "View on GitHub" link in the navigation bar. |
not set |
|
Define this attribute if the project is an official SE-EDU project. This will render the SE-EDU navigation bar at the top of the page, and add some SE-EDU-specific navigation items. |
not set |
4.5. Per-file Documentation Settings
Each .adoc file may also specify some file-specific asciidoc attributes which affects how the file is rendered.
Asciidoctor’s built-in attributes may be specified and used as well.
Attributes left unset in .adoc files will use their default value, if any.
|
| Attribute name | Description | Default value |
|---|---|---|
|
Site section that the document belongs to.
This will cause the associated item in the navigation bar to be highlighted.
One of: * Official SE-EDU projects only |
not set |
|
Set this attribute to remove the site navigation bar. |
not set |
4.6. Site Template
The files in docs/stylesheets are the CSS stylesheets of the site.
You can modify them to change some properties of the site’s design.
The files in docs/templates controls the rendering of .adoc files into HTML5.
These template files are written in a mixture of Ruby and Slim.
|
Modifying the template files in |
5. Testing
5.1. Running Tests
There are three ways to run tests.
| The most reliable way to run tests is the 3rd one. The first two methods might fail some GUI tests due to platform/resolution-specific idiosyncrasies. |
Method 1: Using IntelliJ JUnit test runner
-
To run all tests, right-click on the
src/test/javafolder and chooseRun 'All Tests' -
To run a subset of tests, you can right-click on a test package, test class, or a test and choose
Run 'ABC'
Method 2: Using Gradle
-
Open a console and run the command
gradlew clean allTests(Mac/Linux:./gradlew clean allTests)
| See UsingGradle.adoc for more info on how to run tests using Gradle. |
Method 3: Using Gradle (headless)
Thanks to the TestFX library we use, our GUI tests can be run in the headless mode. In the headless mode, GUI tests do not show up on the screen. That means the developer can do other things on the Computer while the tests are running.
To run tests in headless mode, open a console and run the command gradlew clean headless allTests (Mac/Linux: ./gradlew clean headless allTests)
5.2. Types of tests
We have two types of tests:
-
GUI Tests - These are tests involving the GUI. They include,
-
System Tests that test the entire App by simulating user actions on the GUI. These are in the
systemtestspackage. -
Unit tests that test the individual components. These are in
seedu.address.uipackage.
-
-
Non-GUI Tests - These are tests not involving the GUI. They include,
-
Unit tests targeting the lowest level methods/classes.
e.g.seedu.address.commons.StringUtilTest -
Integration tests that are checking the integration of multiple code units (those code units are assumed to be working).
e.g.seedu.address.storage.StorageManagerTest -
Hybrids of unit and integration tests. These test are checking multiple code units as well as how the are connected together.
e.g.seedu.address.logic.LogicManagerTest
-
5.3. Troubleshooting Testing
Problem: HelpWindowTest fails with a NullPointerException.
-
Reason: One of its dependencies,
HelpWindow.htmlinsrc/main/resources/docsis missing. -
Solution: Execute Gradle task
processResources.
6. Dev Ops
6.1. Build Automation
See UsingGradle.adoc to learn how to use Gradle for build automation.
6.2. Continuous Integration
We use Travis CI and AppVeyor to perform Continuous Integration on our projects. See UsingTravis.adoc and UsingAppVeyor.adoc for more details.
6.3. Coverage Reporting
We use Coveralls to track the code coverage of our projects. See UsingCoveralls.adoc for more details.
6.4. Documentation Previews
When a pull request has changes to asciidoc files, you can use Netlify to see a preview of how the HTML version of those asciidoc files will look like when the pull request is merged. See UsingNetlify.adoc for more details.
6.5. Making a Release
Here are the steps to create a new release.
-
Update the version number in
MainApp.java. -
Generate a JAR file using Gradle.
-
Tag the repo with the version number. e.g.
v0.1 -
Create a new release using GitHub and upload the JAR file you created.
6.6. Managing Dependencies
A project often depends on third-party libraries. For example, Address Book depends on the Jackson library for XML parsing. Managing these dependencies can be automated using Gradle. For example, Gradle can download the dependencies automatically, which is better than these alternatives.
a. Include those libraries in the repo (this bloats the repo size)
b. Require developers to download those libraries manually (this creates extra work for developers)
Appendix A: Product Scope
Target user profile:
-
Busy NUS students.
-
Need to organise group project meetings.
-
Need to organise interest group meet-ups and encourage new participants to attend.
-
Need to find the best time to meet-up based on the schedules of participants and addresses.
-
Some level of tech-savviness to appreciate CLI apps.
-
Have a schedule that works on a weekly basis.
Value proposition:
-
Key concept: Semi-automate the coordination of meeting time/venue based on participant’s schedule.
-
What customers want: Students want to organize all kinds of meetups in a fast and efficient way, eg project meetups, interests groups etc.
-
Limitations of what customers can do now: Hard to coordinate the meetups as they are unable to locate people of available time slots or contact people with similar interests. They have to resort to use platforms such as WhatsApp to advertise their events through friends, and coordinate similar time slots through very manual means such as Google Docs and Doodle.
-
Benefits customers seek to achieve: Students want to do all the scheduling, inviting and finalizing of a meetup in a fast and effective way.
-
How value proposition is delivered: EventOrganiser provides a large database of all the contacts and information of NUS students, which allows the organizers to search by name, availability, interests etc.
Feature
Division of work
Keng Ji : Add event feature with polls and time, location features
-
V1.1: EventOrganiser able to create a basic event with date, time, organiser, participant and poll features.
-
V1.2: Users able to search for events by attributes (date, time, location, interest) and time range.
-
V1.3: Application able to generate poll options based on participants' schedules.
Yao Feng : Add login function and improve on search functions
-
V1.1: Basic login command.
-
V1.2: Search for users based on phone number, interests, friendships, schedule, and address.
-
V1.3: Improved login command with password.
Zhang Cheng : Add additional attributes for networking among users
-
V1.1: Users able to specify their interests.
-
V1.2: Users able to specify friendships with other people.
-
V1.3: Users able to search for friends and become more connected.
Adeel : Add location-related features
-
V1.1: Add feature of nearest MRT for each individual.
-
V1.2: Implement recommendation of best meet-up location via MRT lines.
-
V1.3: Implement Google maps visualisation.
Jason : Event Management/Recommendation
-
V1.1: Pull schedule from NUS Mods and convert to a timetable. Allow Unions of timetable.
-
V1.2: Create, Update, Delete individual slots in timetable. Find best possible time for events using timetables.
-
V1.3: Visualize timetables of multiple friends.
Appendix B: User Stories
Priorities: High (must have) - * * *, Medium (nice to have) - * *, Low (unlikely to have) - *
| Priority | As a … | I want to … | So that I can… |
|---|---|---|---|
|
Event Organiser |
Find people that might be interested in the event that I am organising. |
Find potentially interested individuals to join my event. |
|
Event Organiser |
Allow my participants to vote for their most preferred time and location. |
Organise an event at a time and location based on popular vote. |
|
Event Organiser |
Automate the task of sieving through the schedules of all my participants for the ideal meet-up location and meet-up time. |
Do not have to worry about the hassle of finding the best time and location for my event. |
|
Event Organiser |
Have a specialised platform to post events aimed at a tech-savvy audience. |
Promote my event to an audience that I am interested in. |
|
Busy User |
Have a platform to search for all the events that occur during my free time. |
Easily find a event that I have time to go for. |
|
Tech-savvy User |
Have a platform that supports CLI. |
Easily write scripts to automatic the task that I want to accomplish on a regular basis. |
|
User |
Keep track of all the events that I can gone to. |
Have a record of the events that I have been to. |
|
User |
[Coming in v2.0] Visualise the event location on Google maps. |
Find out exactly how to get to that location. |
|
User |
Have a social media kind of platform which specialises on organising events. |
Know the events that my friends are going to and let my friends know about the events that I am going to. |
|
User |
Easily find other users based on their particulars. |
Find my friends or anyone that might be of interest to me. |
|
User |
Create an individual profile with some security features. |
I can access and make changes to my own profile easily, but other people will not have access to it. |
|
NUS student |
Have a platform that utilises NUSMODS’s schedule. |
Conveniently update my schedule using NUSMODS’s schedule. |
|
NUS student |
Have a platform that can facilitate the task of finding the ideal time and location for project group meet-ups. |
Easily organise project group meet-ups instead of asking each individual group mates one by one. |
|
User |
Find mutual friends in among my social circle and people with similar interests as me. |
I can widen my social circle and meet like minded people. |
Appendix C: Use Cases
(For all use cases below, the System is the EventOrganiser, unless specified otherwise)
Use case: U01 - Create new user
Actor: New user
MSS:
-
User creates new user profile.
-
System checks that the details are valid.
-
System informs the user that the profile has been successfully created.
Use case ends.
Extensions:
-
2a. User enters invalid detail.
-
2a1. System will prompt user to re-enter their details.
-
2a2. User enters profile details again.
Steps 2a1 - 2a2 are repeated until the details entered are valid.
Use case resumes from step 3.
-
Use case: U02 - Log in to a user account
Actor: User
MSS:
-
User creates enters his credentials.
-
System checks that the details are valid.
-
System informs the user that he/she has successfully logged in.
Use case ends.
Extensions:
-
2a. User enters invalid details.
-
2a1. System will prompt user to re-enter their details.
-
2a2. User enters profile details again.
Steps 2a1 - 2a2 are repeated until the details entered are valid.
Use case resumes from step 3.
-
Use case: U03 – Delete a user
Actor: User
MSS:
-
User chooses to delete his/her user profile.
-
System checks that the profile that will be deleted corresponds to the profile of the current user.
-
System informs the user that the profile has been successfully deleted.
-
System deletes the user profile within its storage.
Use case ends.
Extensions:
-
2a. The profile to be deleted does not correspond to the profile of the current user.
-
2a1. System informs user that the profile cannot be deleted.
-
2a2. User either change his profile or change the profile that he/she wants to delete.
Steps 2a1 – 2a2 are repeated until the current user and the user profile that will be deleted matches.
Use case resumes from step 3.
-
Use case: U04 – Create new event
Actor: Event organiser
Precondition: Event organiser has logged himself/herself in
MSS:
-
Event organiser creates a new event by specifying the name, location and tags of the event.
-
System checks that the details are valid.
-
System informs the event organiser that the event has been successfully created.
Use case ends.
Extensions:
-
2a. Event organiser enters invalid details.
-
2a1. System will prompt event organiser to re-enter the event details.
-
2a2. Event organiser enters event details again.
Steps 2a1 - 2a2 are repeated until the details entered are valid.
Use case resumes from step 3.
-
Use case: U05 – Delete an event
Actor: Event organiser
Precondition: Event organiser has identified himself/herself
MSS:
-
Event organiser chooses to delete an event.
-
System checks that the event belongs to the user.
-
System informs the event organiser that the event has been successfully deleted.
Use case ends.
Extensions:
-
2a. The event that will be deleted does not belong to the user.
-
2a1. System will inform the user that the event cannot be deleted.
-
2a2. User either change his profile or change the event that he/she wants to delete.
-
Steps 2a1 – 2a2 are repeated until the event belongs to the current user.
Use case resumes from step 3.
-
Use case: U06 - User joins an event
Actor: User
Precondition: User has logged in
MSS:
-
User searches for available events.
-
System shows user all the events that are available.
-
User chooses an event that he wants to join.
-
System informs the user that he/she has been successfully joined the event.
Use case ends.
Extensions:
-
1a. User may specify extra details to filter out search results.
Use case resumes at step 2.
Use case: U07 – Event organiser creates a poll
Actor: Event organiser
Precondition: Event organiser has logged in and created an event
MSS:
-
Event organiser selects an event.
-
Event organiser creates a new poll.
-
Event organiser creates options for the poll.
-
System informs the event organiser’s options has been successfully updated.
-
System updates polling information in its storage.
Use case ends.
Use case: U08 – User votes in a poll
Actor: User who is keen to join an event
Precondition: User has logged in and has joined an event
MSS:
-
User selects a poll from the poll list of the event.
-
System displays the poll selected by the user.
-
User looks at the options given in the poll and votes for his/her preferred options.
-
System adds the user to the voter list of that option.
-
System updates the list of most popular options in the poll.
-
System updates polling information in its storage.
Use case ends.
Use case: U09 – Event organiser confirms the event details
Actor: Event organiser
Precondition: Event organiser has logged in, event participants have all joined and voted in polls
MSS:
-
Event organiser looks at the poll results.
-
System shows the top options for each of the polls.
-
Event organiser decides on the ideal time, date and location for the event and sets them accordingly.
-
System informs the user’s options has been successfully updated.
-
System updates event information in its storage.
Use case ends.
Appendix D: Non Functional Requirements
-
Should work on any mainstream OS as long as it has Java
9or higher installed. -
Should be able to hold up to 1000 persons without a noticeable sluggishness in performance for typical usage.
-
A user with above average typing speed for regular English text (i.e. not code, not system admin commands) should be able to accomplish most of the tasks faster using commands than using the mouse.
-
Commands should be intuitive for users to pick up easily.
-
Allows a limited form of security by ensuring that users are only able to log in to their own accounts.
Appendix E: Glossary
- Unique user
-
Refers to an user which has an unique tuple of NAME and PASSWORD.
- User / Person
-
Refers to a person who uses EventOrganiser.
- User Profile
-
Refers to an account that is recorded in EventOrganiser.
- New User
-
Refers to a person who does not own a user profile in EventOrganiser.
- Current User
-
Refers to the user currently identified by the system.
- Event Organiser
-
Refers to a user who has created an event.
Appendix G: Instructions for Manual Testing
Given below are instructions to test the app manually.
| These instructions only provide a starting point for testers to work on; testers are expected to do more exploratory testing. The result of the test cases under each command is assumed to not persist to the next test case unless otherwise stated |
G.1. Launch and Shutdown
-
Initial launch
-
Download the jar file and copy into an empty folder
-
Double-click the jar file
Expected: Shows the GUI with a set of sample contacts. The window size may not be optimum.
-
-
Saving window preferences
-
Resize the window to an optimum size. Move the window to a different location. Close the window.
-
Re-launch the app by double-clicking the jar file.
Expected: The most recent window size and location is retained.
-
G.2. Add a user
-
Note: The states of each test case is continued in the next test case.
-
Prerequisites: EventOrganiser has no users currently.
-
Test case:
addUser n/Alex Yeoh pass/passwordExpected: Invalid command format. -
Test case:
addUser n/Alex Yeoh e/alex@exmple.com a/Blk 12 John Street, #10-11 pass/password p/91234567Expected: New person added.
G.3. Login a user
-
Note: The states of each test case is continued in the next test case.
-
Prerequisites: EventOrganiser already has a user with name as "Alex Yeoh" and password as "password". No user is currently logged in. EventOrganiser does not have a user with name as "Michael Lim" and password as "password".
-
Test case:
loginExpected: Login unsuccessful. -
Test case:
login n/Michael Lim pass/passwordExpected: Login unsuccessful. -
Test case
login n/Alex Yeoh pass/passwordExpected: Login successful.
G.4. Logout a user
-
Note: The states of each test case is continued in the next test case.
-
Prerequisites: A user with name as "Alex Yeoh" and password as "password" is currently logged in.
-
Test case
logoutExpected: Logout successful. -
Test case:
logoutExpected: Logout unsuccessful.
G.5. Find users
-
Prerequisites: EventOrganiser currently has two user accounts. The first user has name as "Alex Yeoh" and interests as "study". The second user has name as "Bernice Yu" and interest as "play".
-
Test case
findUser n/Alex YeohExpected: Only user "Alex Yeoh" is listed. -
Test case:
findUser i/playExpected: Only user "Bernice Yu" is listed. -
Test case:
findUser n/Alex Yeoh i/playExpected: No user is listed.
G.6. Edit a user
-
Prerequisites: EventOrganiser has a user with name as "Alex Yeoh" and user "Alex Yeoh" is currently logged in.
-
Test case
editUser n/Alex TanExpected: Name of user successfully changed to "Alex Tan".
G.7. Delete a user
-
Prerequisites: EventOrganiser has a user with name as "Alex Yeoh" and user "Alex Yeoh" is currently logged in.
-
Test case
deleteUserExpected: user "Alex Yeoh" successfully deleted.
G.8. Populate a user schedule via Timetable
-
Prerequisites: EventOrganiser has a user with name as "Alex Yeoh" and user "Alex Yeoh" is currently logged in.
-
Test case
editUser tt/http://modsn.us/H4v8sExpected: Schedule of user successfully overwritten to 100000000000000011110000000011110000000000 000000000000000000000000000000111111110000000000000000000000000000000000001100000011110000000000 000000000000000000000000000000111100001111000000000000000000000000000000111100001111111111000000 000000000000000000000000000000000000000000000000000000000000000000000000000000000000000000000000 000000. -
Test case
editUser tt/http://modsn.us/HExpected: Invalid NUSmods Link
G.9. Edit a user schedule
-
Prerequisites: EventOrganiser has a user with name as "Alex Yeoh", no existing schedule and user "Alex Yeoh" is currently logged in.
-
Test case
editUser su/monday 0000Expected: Schedule of user "Alex Yeoh" successfully changed. First bit of the schedule is now 1. -
Test case
editUser su/monday 0030Expected: Schedule of user "Alex Yeoh" successfully changed. Second bit of the schedule is now 1.
G.10. Find free time between two users
-
Prerequisites: EventOrganiser has 2 users A and B on index 1 and 2. Both A and B has no existing schedule.
-
Test case
maxSchedule 1 2 sl/0000-0000Expected: Free time of 0000 from Monday to Sunday is displayed. -
Test case
maxSchedule 1 2 sl/0800-0900Expected: Free time of 0800, 0830, 0900 and 0930 from Monday to Sunday are displayed.
G.11. Add a friend
-
Prerequisites: Event Organiser has users with name "Alex Yeoh"(index 1) and "Bernice Yu"(index 2), and "Bernice Yu" is not currently in "Alex Yeoh"'s friend list, and user "Alex Yeoh" is currently logged in.
-
Test case
addFriend 2Expected: "Bernice Yu" is added to "Alex Yeoh" friend list.
G.12. Delete a friend
-
Prerequisites: Event Organiser has users with name "Alex Yeoh"(index 1) and "Bernice Yu"(index 2), and "Bernice Yu" is currently in "Alex Yeoh"'s friend list, and user "Alex Yeoh" is currently logged in.
-
Test case
deleteFriend 2Expected: "Bernice Yu" is deleted from "Alex Yeoh" friend list.
G.13. Add an event
-
Prerequisites: EventOrganiser has a user with name as "Alex Yeoh" and user "Alex Yeoh" is currently logged in.
-
Test case
addEvent n/CS1234 Group Meeting a/SoC Canteen t/URGENTExpected: new event with detailsCS1234 Group Meeting Location: SoC Canteen Tags: [URGENT]is added and selected. "Alex Yeoh" is the event organiser. Event details are displayed in the event details panel, and "Alex Yeoh" is a participant of the event under "People attending". -
Test case
addEvent n/CS1234 Group Meeting t/URGENTExpected: Add event unsuccessful.
G.14. Add a poll
-
Prerequisites: Event organiser "Alex Yeoh" is logged in and has selected the first event in the event list, created by him.
-
Test case
addPoll n/Meeting dateExpected: a new poll with name "Meeting date" is created and displayed in the event details panel.
G.15. Add a time poll
-
Prerequisites: Event organiser "Alex Yeoh" is logged in and has selected the first event in the list, created by him.
-
Test case
addTimePoll d1/19-12-2018 d2/20-12-2018Expected: a new poll with name "Time Poll" is created and displayed in the event details panel. It is populated by 30 minute slots based on the schedules of the participants.
G.16. Add poll options
-
Prerequisites: Event organiser "Alex Yeoh" is logged in and has selected an event created by him.
-
Test case
addOption i/1 o/12 DecemberExpected: a new poll option with name "12 December" is created and displayed in the event details panel. -
Test case
addOption i/1 o/13 DecemberExpected: a new poll option with name "13 December" is created and displayed in the event details panel.
G.17. Delete an event
-
Prerequisites: Event organiser "David Li" is logged in and "David Li" is the organiser of event at index 2 but not event at index 1.
-
Test case
deleteEvent 2Expected: Event at index 2 is deleted -
Test case
deleteEvent 1Expected: Event 1 is not deleted, an error message "You are not the organiser of this event." is returned.
G.18. Select an event
-
Prerequisites: The event list is not empty.
-
Test case
selectEvent 1Expected: The event details panel displays the details of the event at index 1.
G.19. Display poll
-
Prerequisites: The event at index 1 has been selected and there is a poll in the event.
-
Test case
displayPoll 1Expected: Poll at index 1 of the poll list of the first event is displayed.
G.20. Edit an event
-
Prerequisites: Event organiser "Alex Yeoh" is logged in and has selected an event created by him.
-
Test case
editEvent n/CS2100 Discussion a/NUS UTownExpected: The selected event is edited to have the name "CS2100 Discussion" and the location "NUS UTown". -
Test case
editEvent t/URGENTExpected: The selected event is edited to have only one tag "URGENT"
G.21. Find an event by attributes
-
Prerequisites: The event list is not empty.
-
Test case
findEvent e/Linguistics Reading GroupExpected: all and only events with name "Linguistics Reading Group" are displayed in the event list. -
Test case
findEvent t1/17:30 on/Charlotte OliveiroExpected: all and only events starting at 17:30 and organised by "Charlotte Oliveiro" are displayed in the event list.
G.22. Find event by time
-
Prerequisites: The event list is not empty.
-
Test case
findEventByTime d/01-12-2018 t1/07:30 t2/17:30Expected: all and only events held between 07:30 and 17:30 on 01-12-2018 are displayed.
G.23. List all events
-
Prerequisites: NIL
-
Test case
listEventExpected: All events in the event organiser are displayed in the events list.
G.24. Set date
-
Prerequisites: Event organiser "Alex Yeoh" is logged in and has selected an event created by him.
-
Test case
setDate d/12-12-2018Expected: the date "12-12-2018" is set and appears in the event card of the event.
G.25. Set time
-
Prerequisites: Event organiser "Alex Yeoh" is logged in and has selected an event created by him.
-
Test case
setTime t1/12:30 t2/14:30Expected: the times "12:30 - 14:30" are set and appear in the event card of the event.
G.26. Join event
-
Prerequisites: A user "Charlotte Oliveiro" is logged in and has yet to join the first event in the list.
-
Test case
joinEvent 1Expected: The user "Charlotte Oliveiro" is added to the participants list of the first event. The new event details are displayed in the event details panel.
G.27. Vote in poll
-
Prerequisites: User "Charlotte Oliveiro" is logged in and joined the first event in the list, to which the event organiser has added a poll "Meeting Date" at poll index 1. In the poll, there are the options
12 Decemberand13 Decemberwith no voters. -
Test case
vote i/1 o/12 DecemberExpected: The user "Charlotte Oliveiro" is added to the voter list of the option "12 December" The most popular options list updates to include "12 December"
G.28. Saving data
-
Dealing with missing/corrupted data files
-
Corrupted XML file: the application would not run to prevent unexpected responses.
-
Missing XML file: the application will re-generate the sample xml, and save it as data/addressbook.xml when a change in the sample data.
-